Chart teeth
Before you start
- Open the patient's encounter. See Start an encounter.
- Teeth are numbered with the FDI system unless you changed it in Settings › General › Tooth notation.
Steps
1. Open the chart
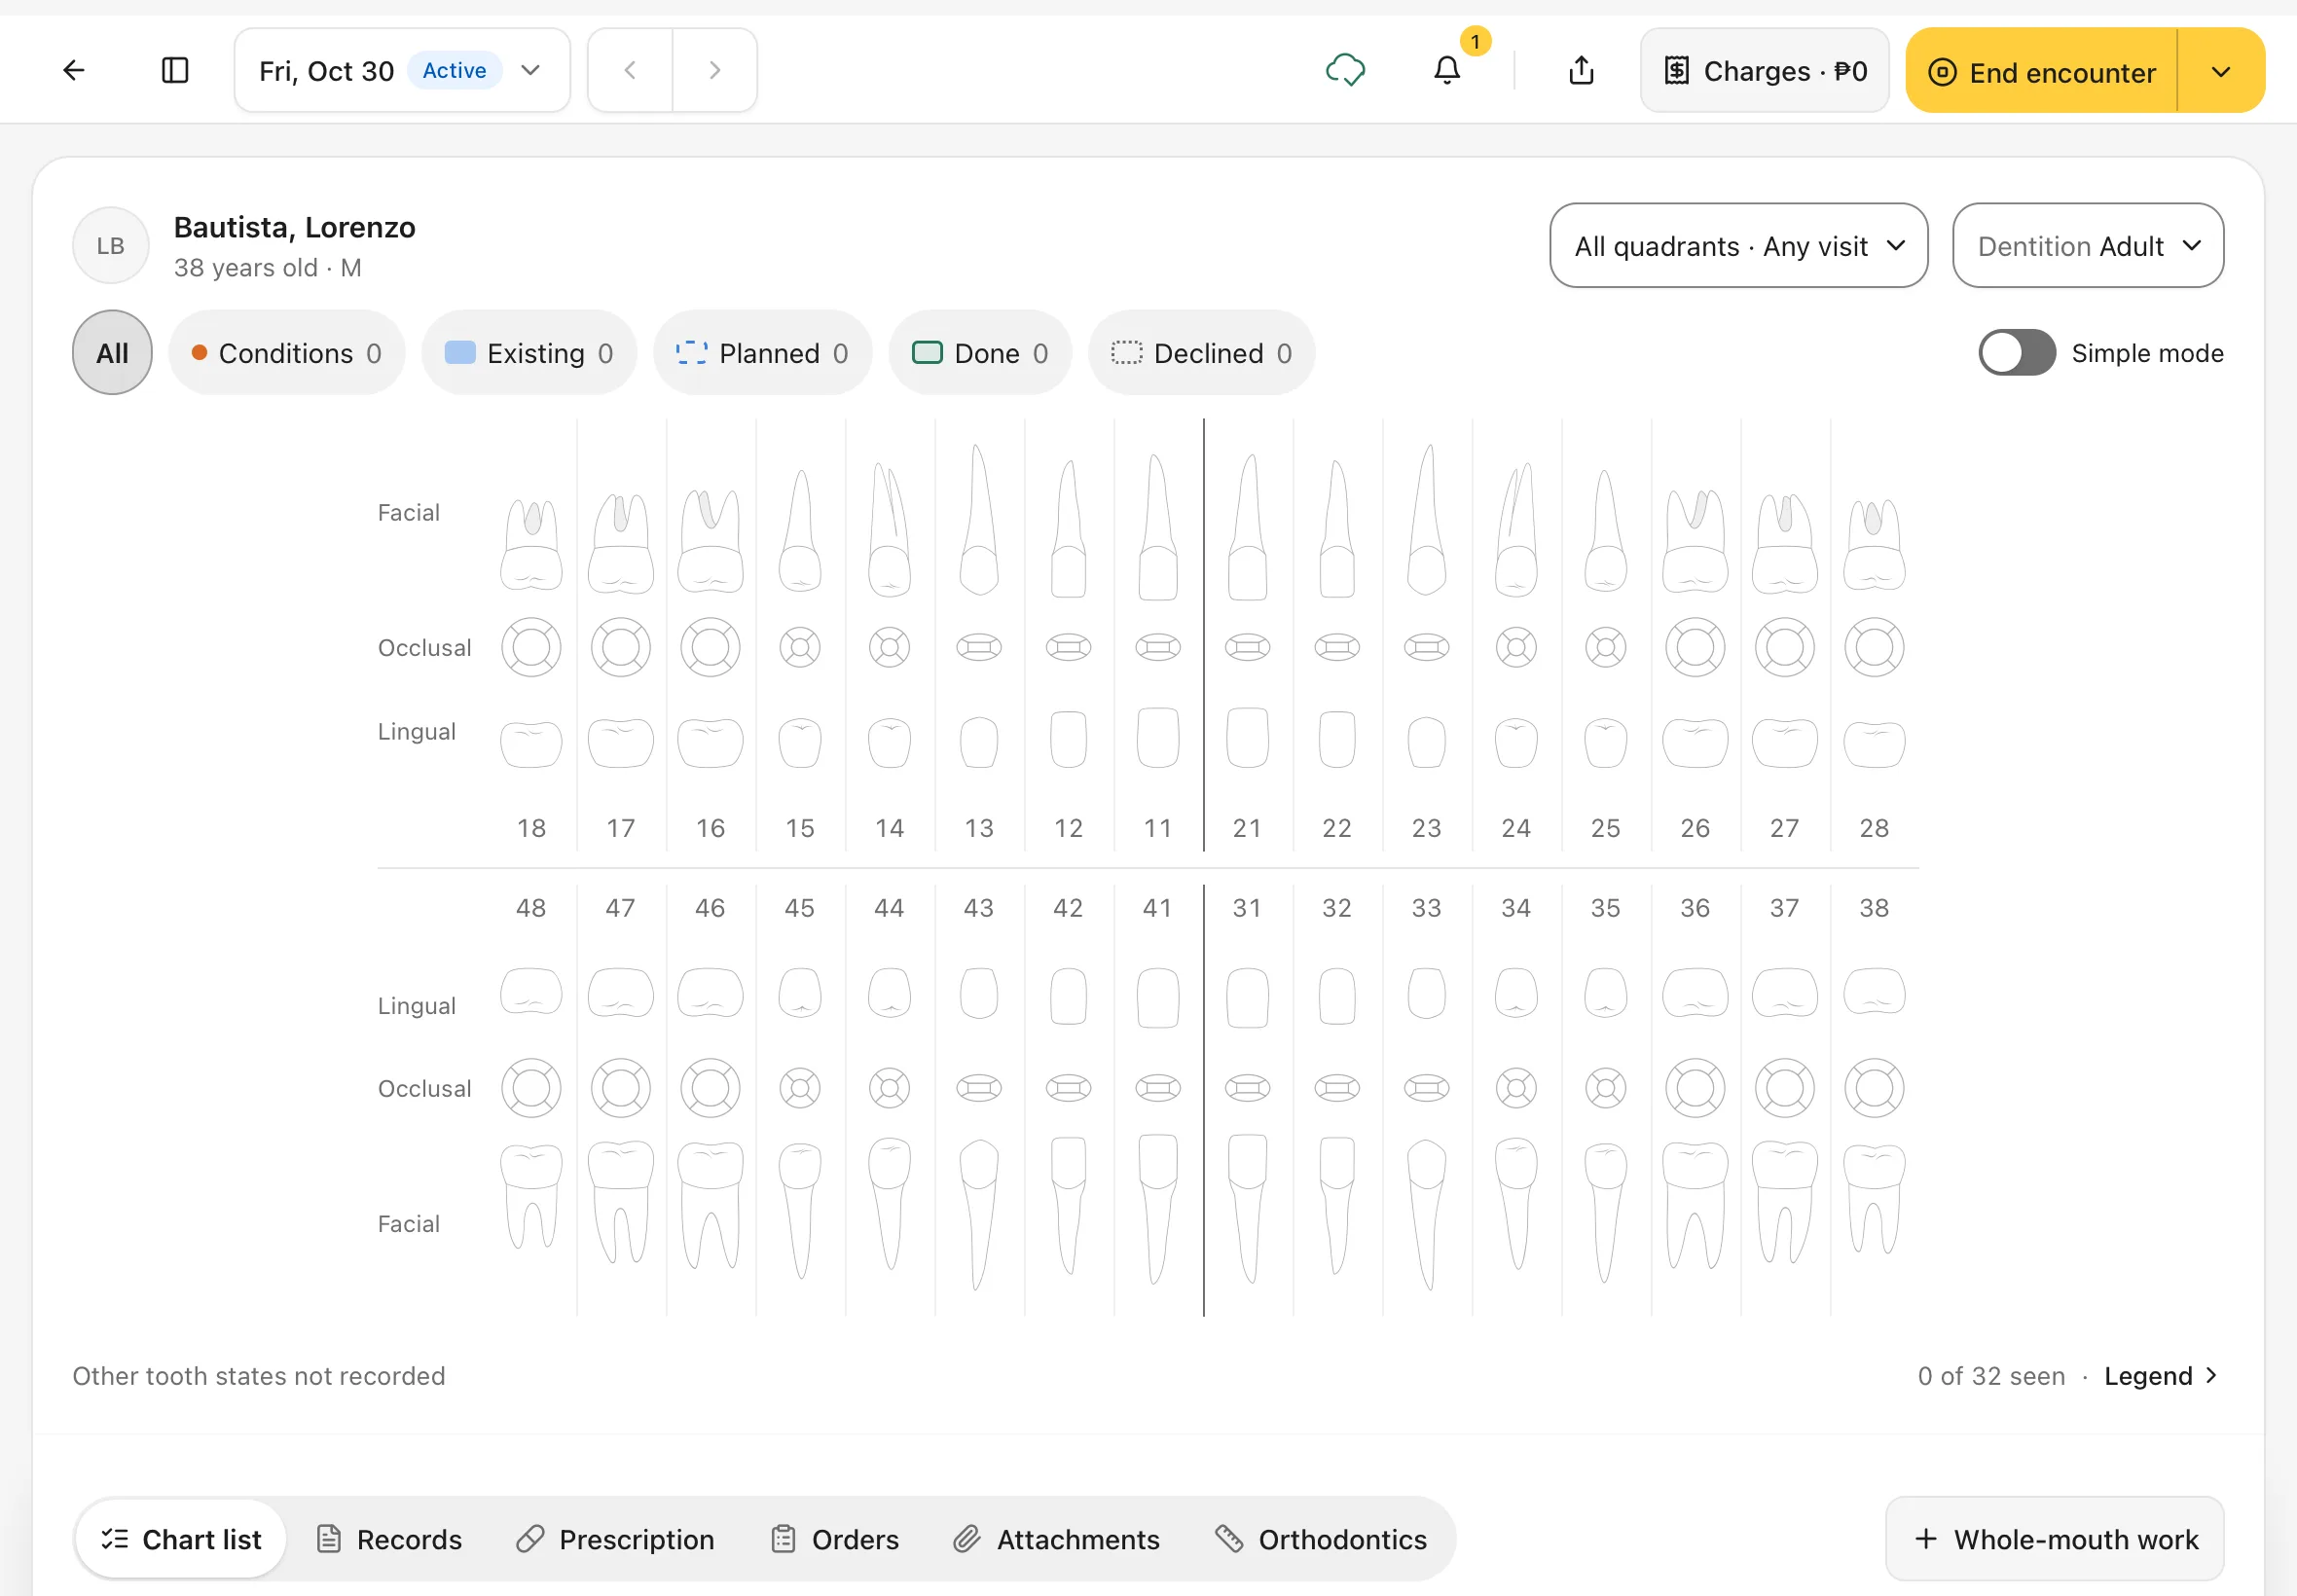
The chart is at the top of the encounter, under the patient's name. The first time you see a patient, no tooth is marked yet.
2. Get to know the chart
Each tooth is drawn from three sides (Facial, Occlusal, Lingual), with its number underneath.
Next to the patient's name:
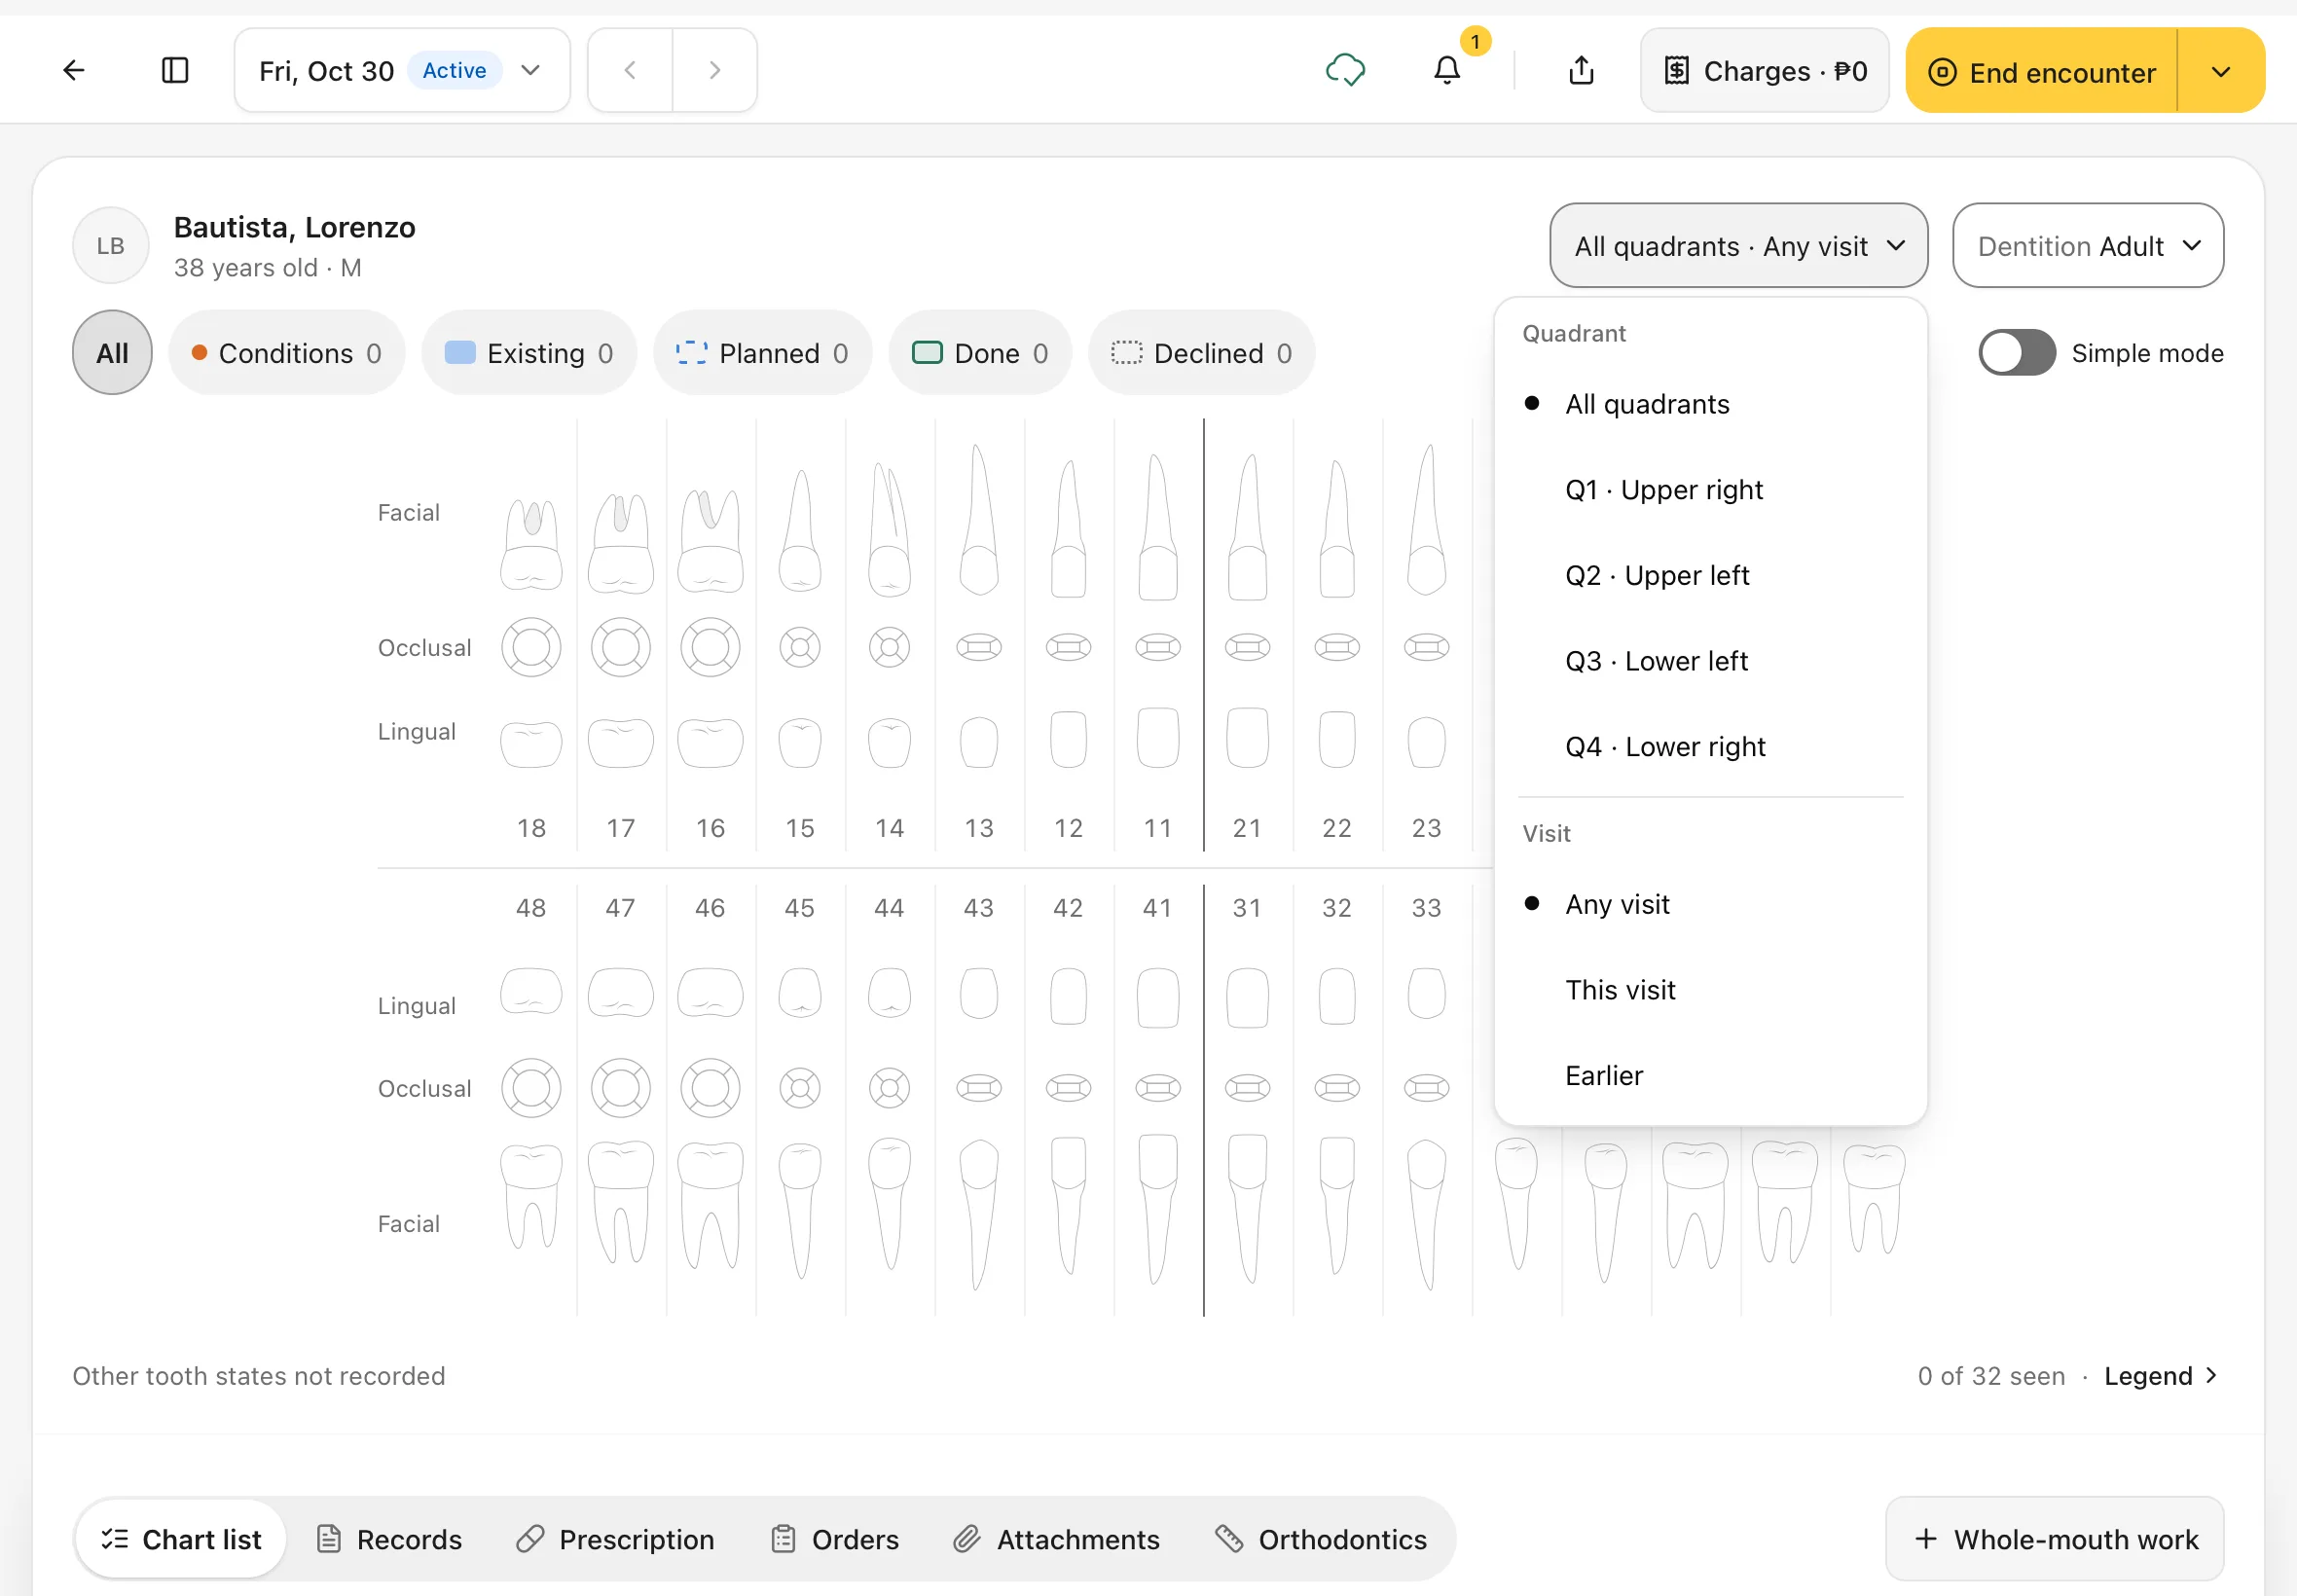
- All quadrants · Any visit is one menu with two choices. Under Quadrant, pick one, for example Q4 · Lower right, to zoom in so the teeth are bigger and easier to tap; choose All quadrants to see the whole mouth again. Under Visit, show marks from This visit, Earlier visits, or Any visit. These only change what you see; they never change the chart.
- Dentition sets which teeth the chart draws: Child, Mixed or Adult. Unlike the menu beside it, this choice is saved to the patient's chart, with Undo.
Above the chart:
- The chips All, Conditions, Existing, Planned, Done and Declined show only that kind of mark, with a count of each.
- Simple mode shows only the biting surface of each tooth, without the side views. It's quicker to read; switch it off to see every surface. Your choice is remembered for you.
Under the chart, the count of teeth seen (for example 0 of 32 seen) sits next to Legend ›, which explains every colour and code.
You should see: an empty chart with teeth 18 to 28 on top and 48 to 38 below.
3. Tap a tooth
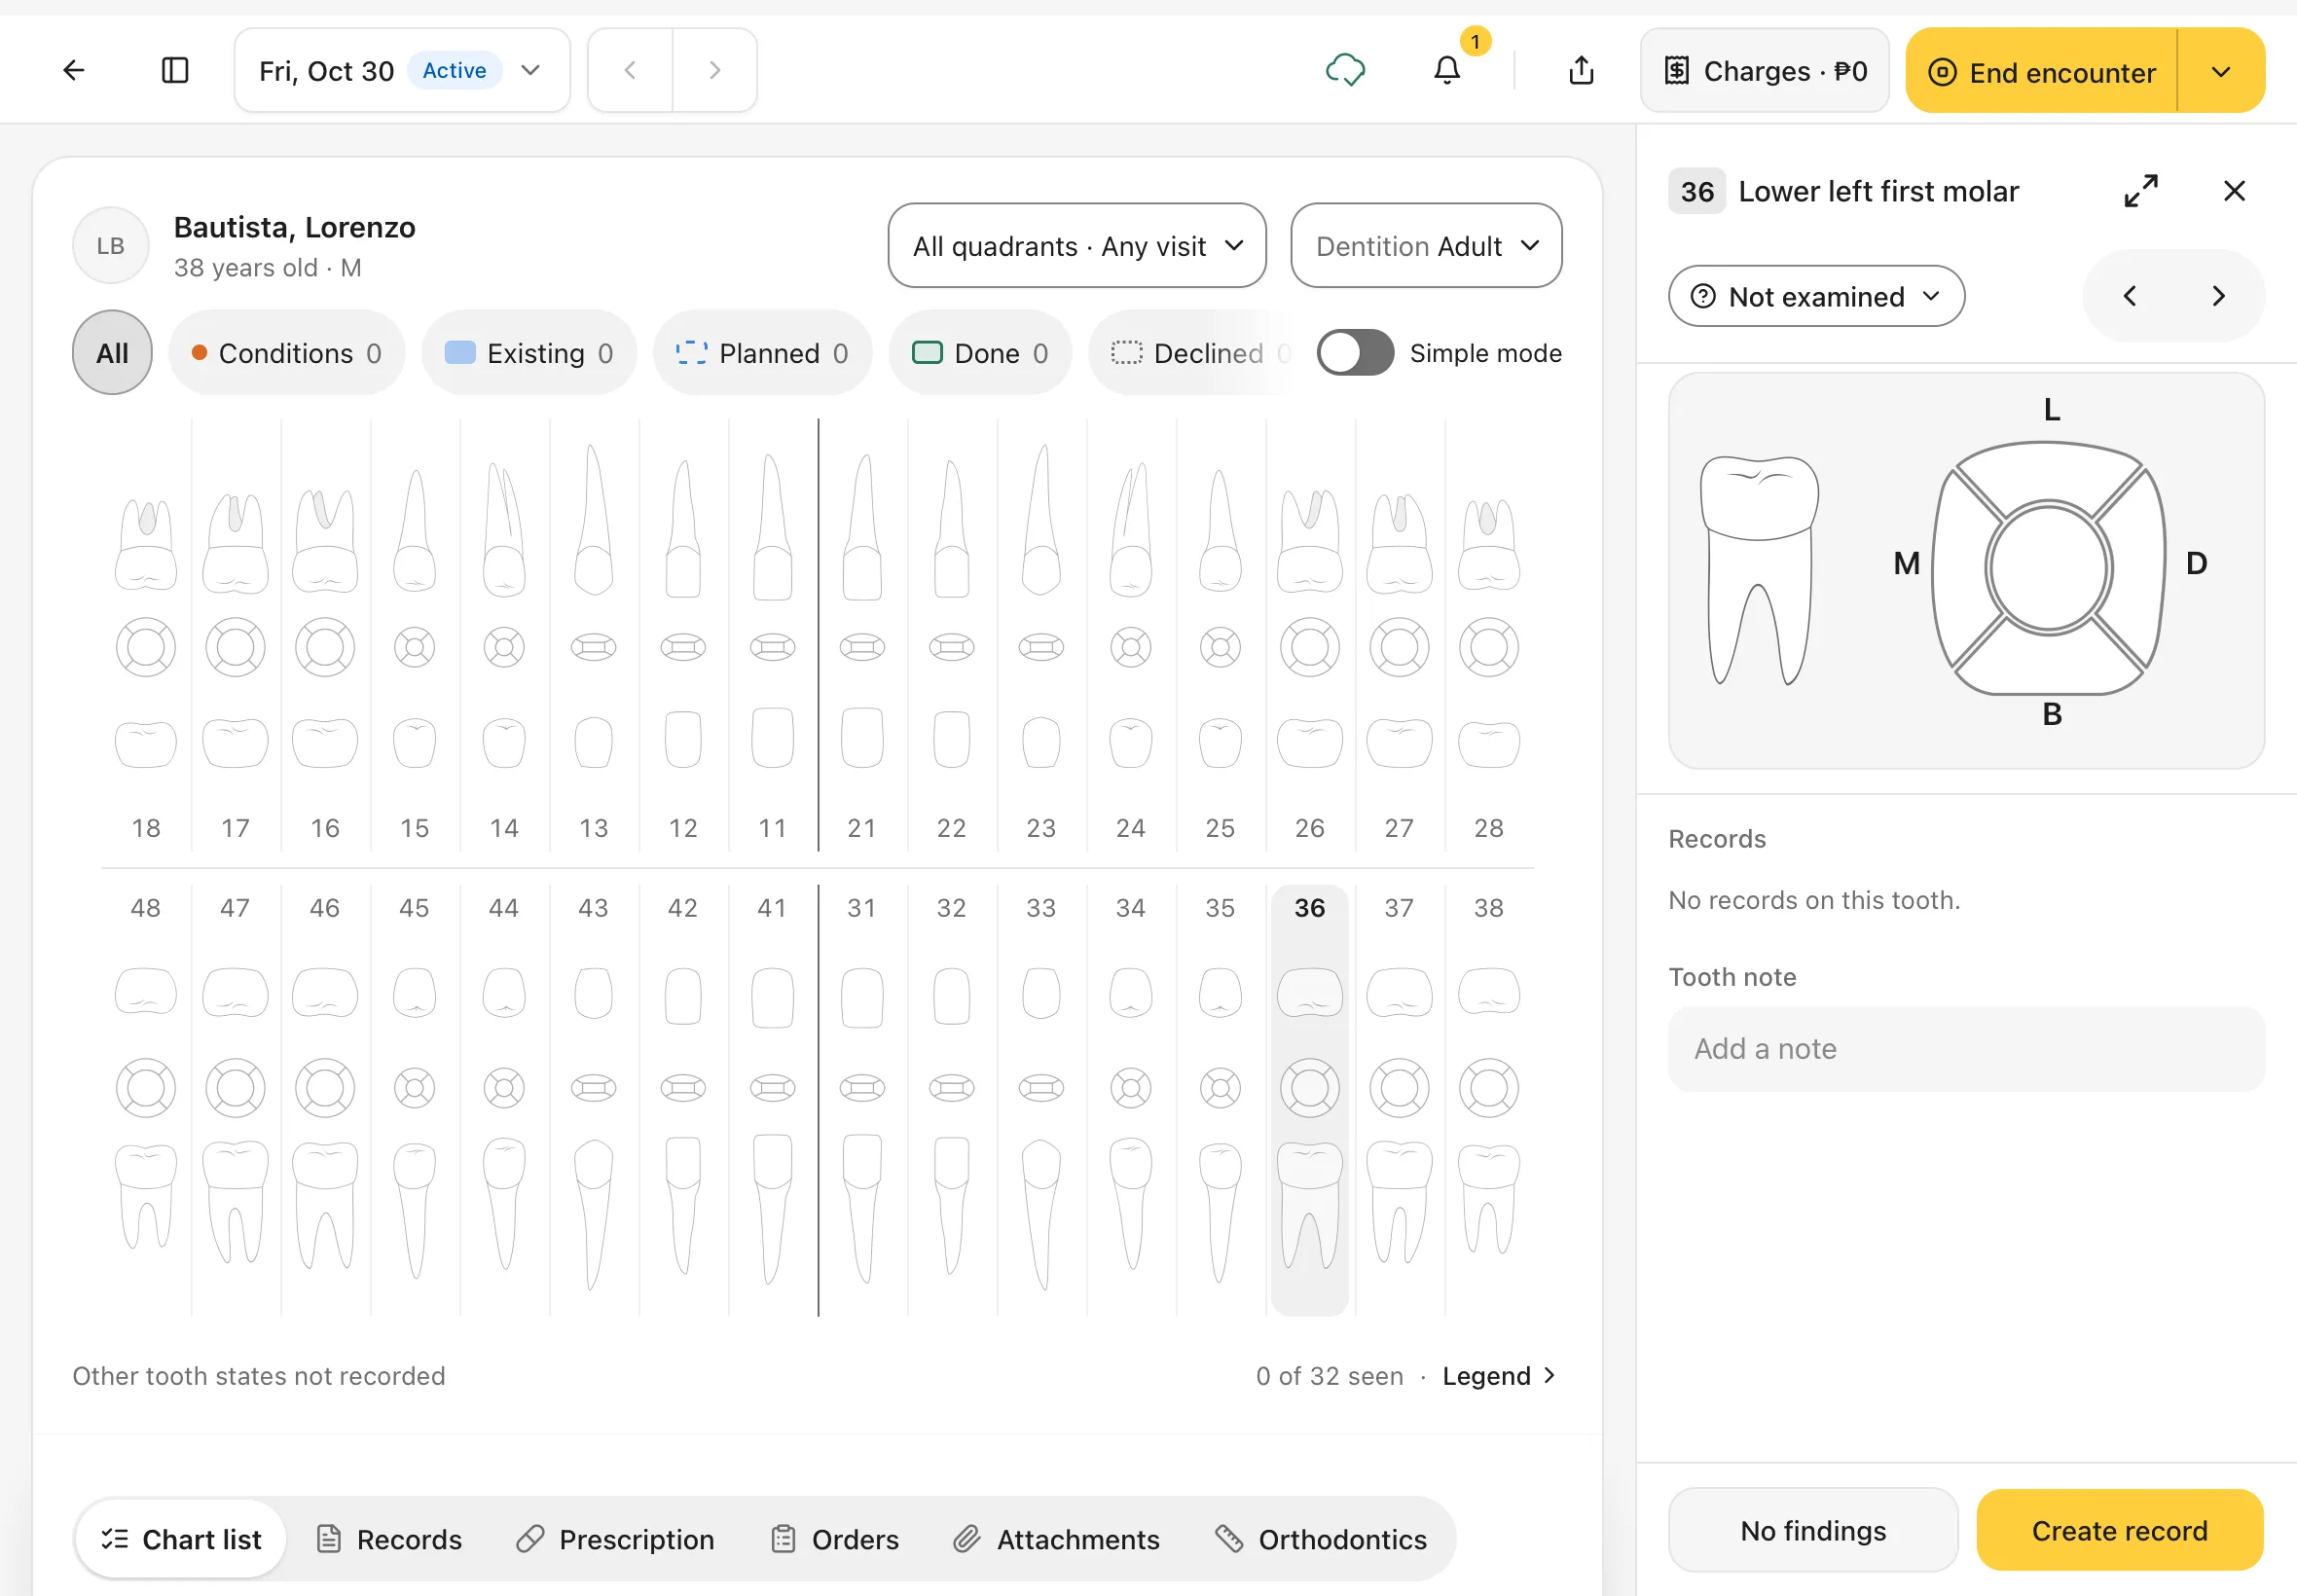
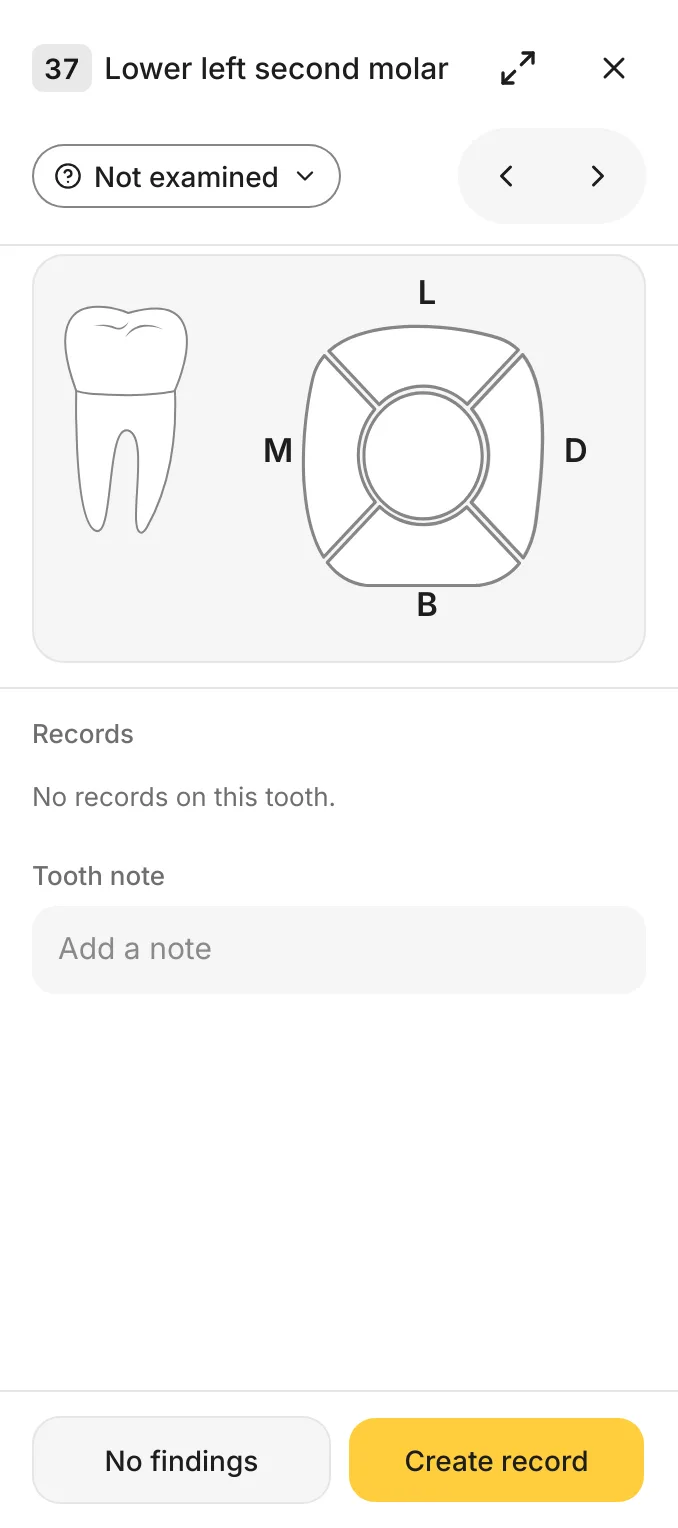
Tap any tooth. The tooth panel opens on the right, with:
- the tooth's number and name, for example 36 Lower left first molar
- its state (Not examined until you record something)
- ‹ and › to move to the previous or next tooth
- its records, and a Tooth note box
You should see: the tooth highlighted on the chart and its panel on the right, with No findings and Create record at the bottom.
4. Create a record: choose the condition
Tap Create record. A short three-step record opens: Condition, Treatment, Review.
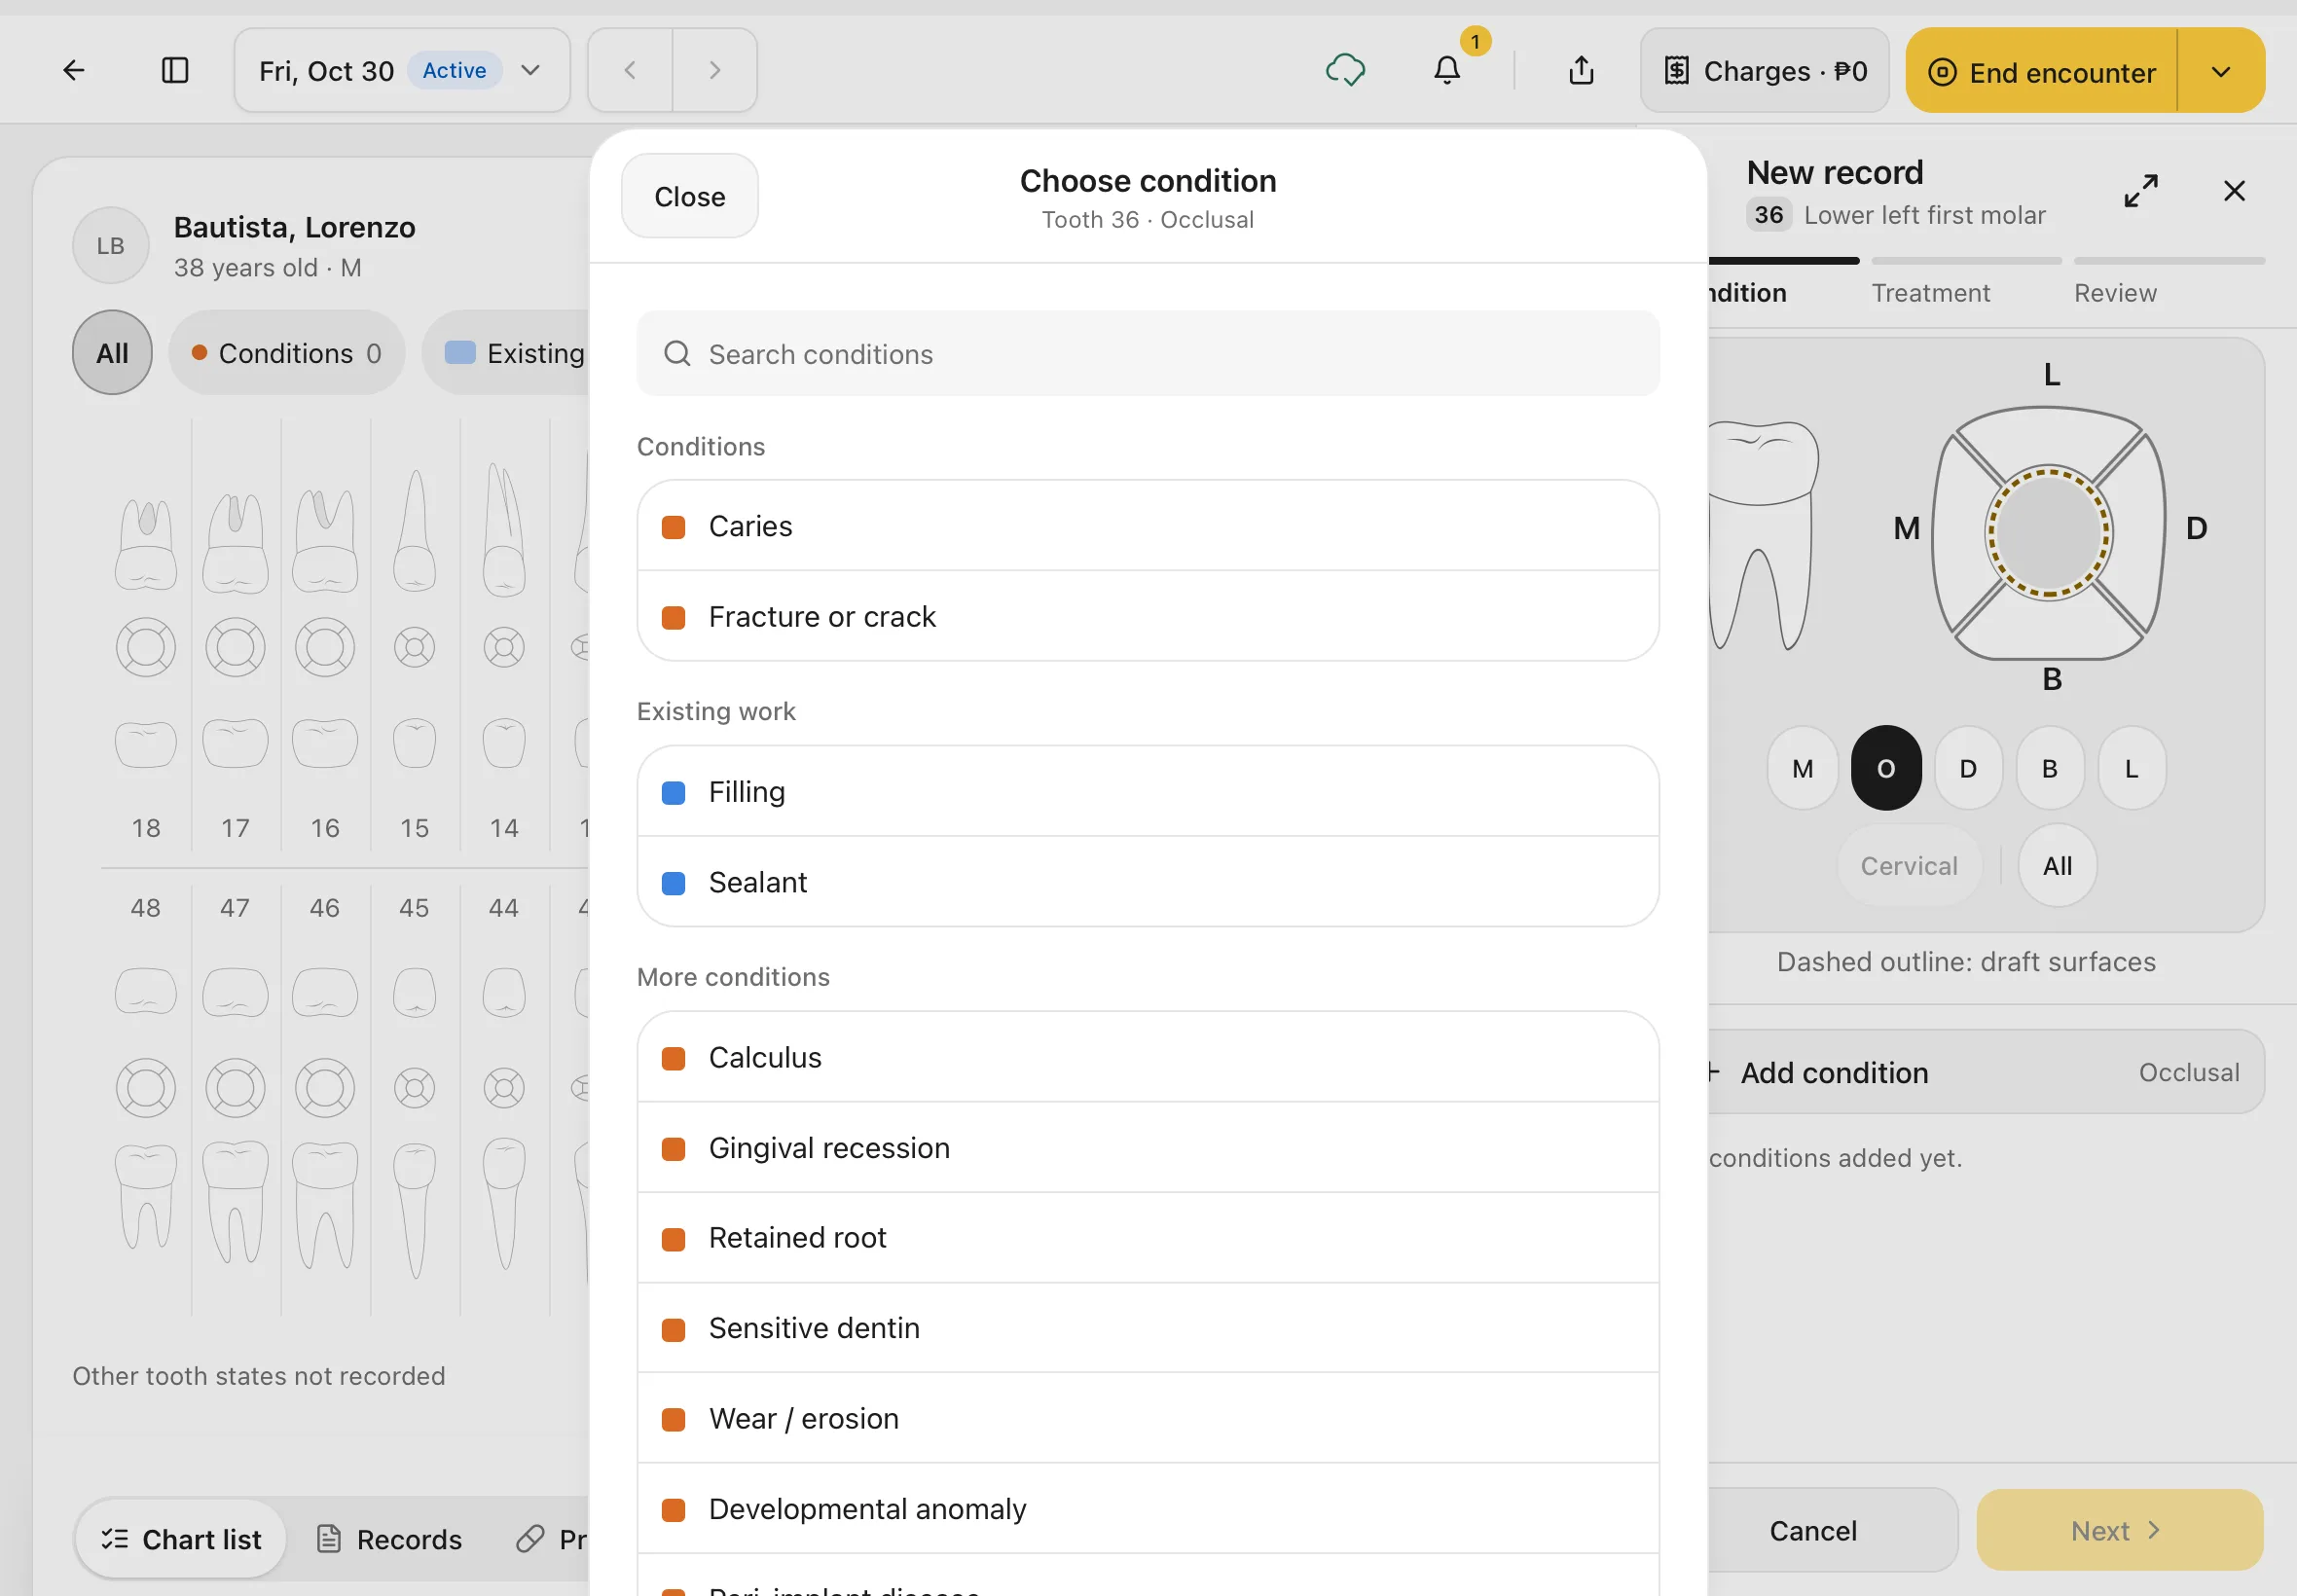
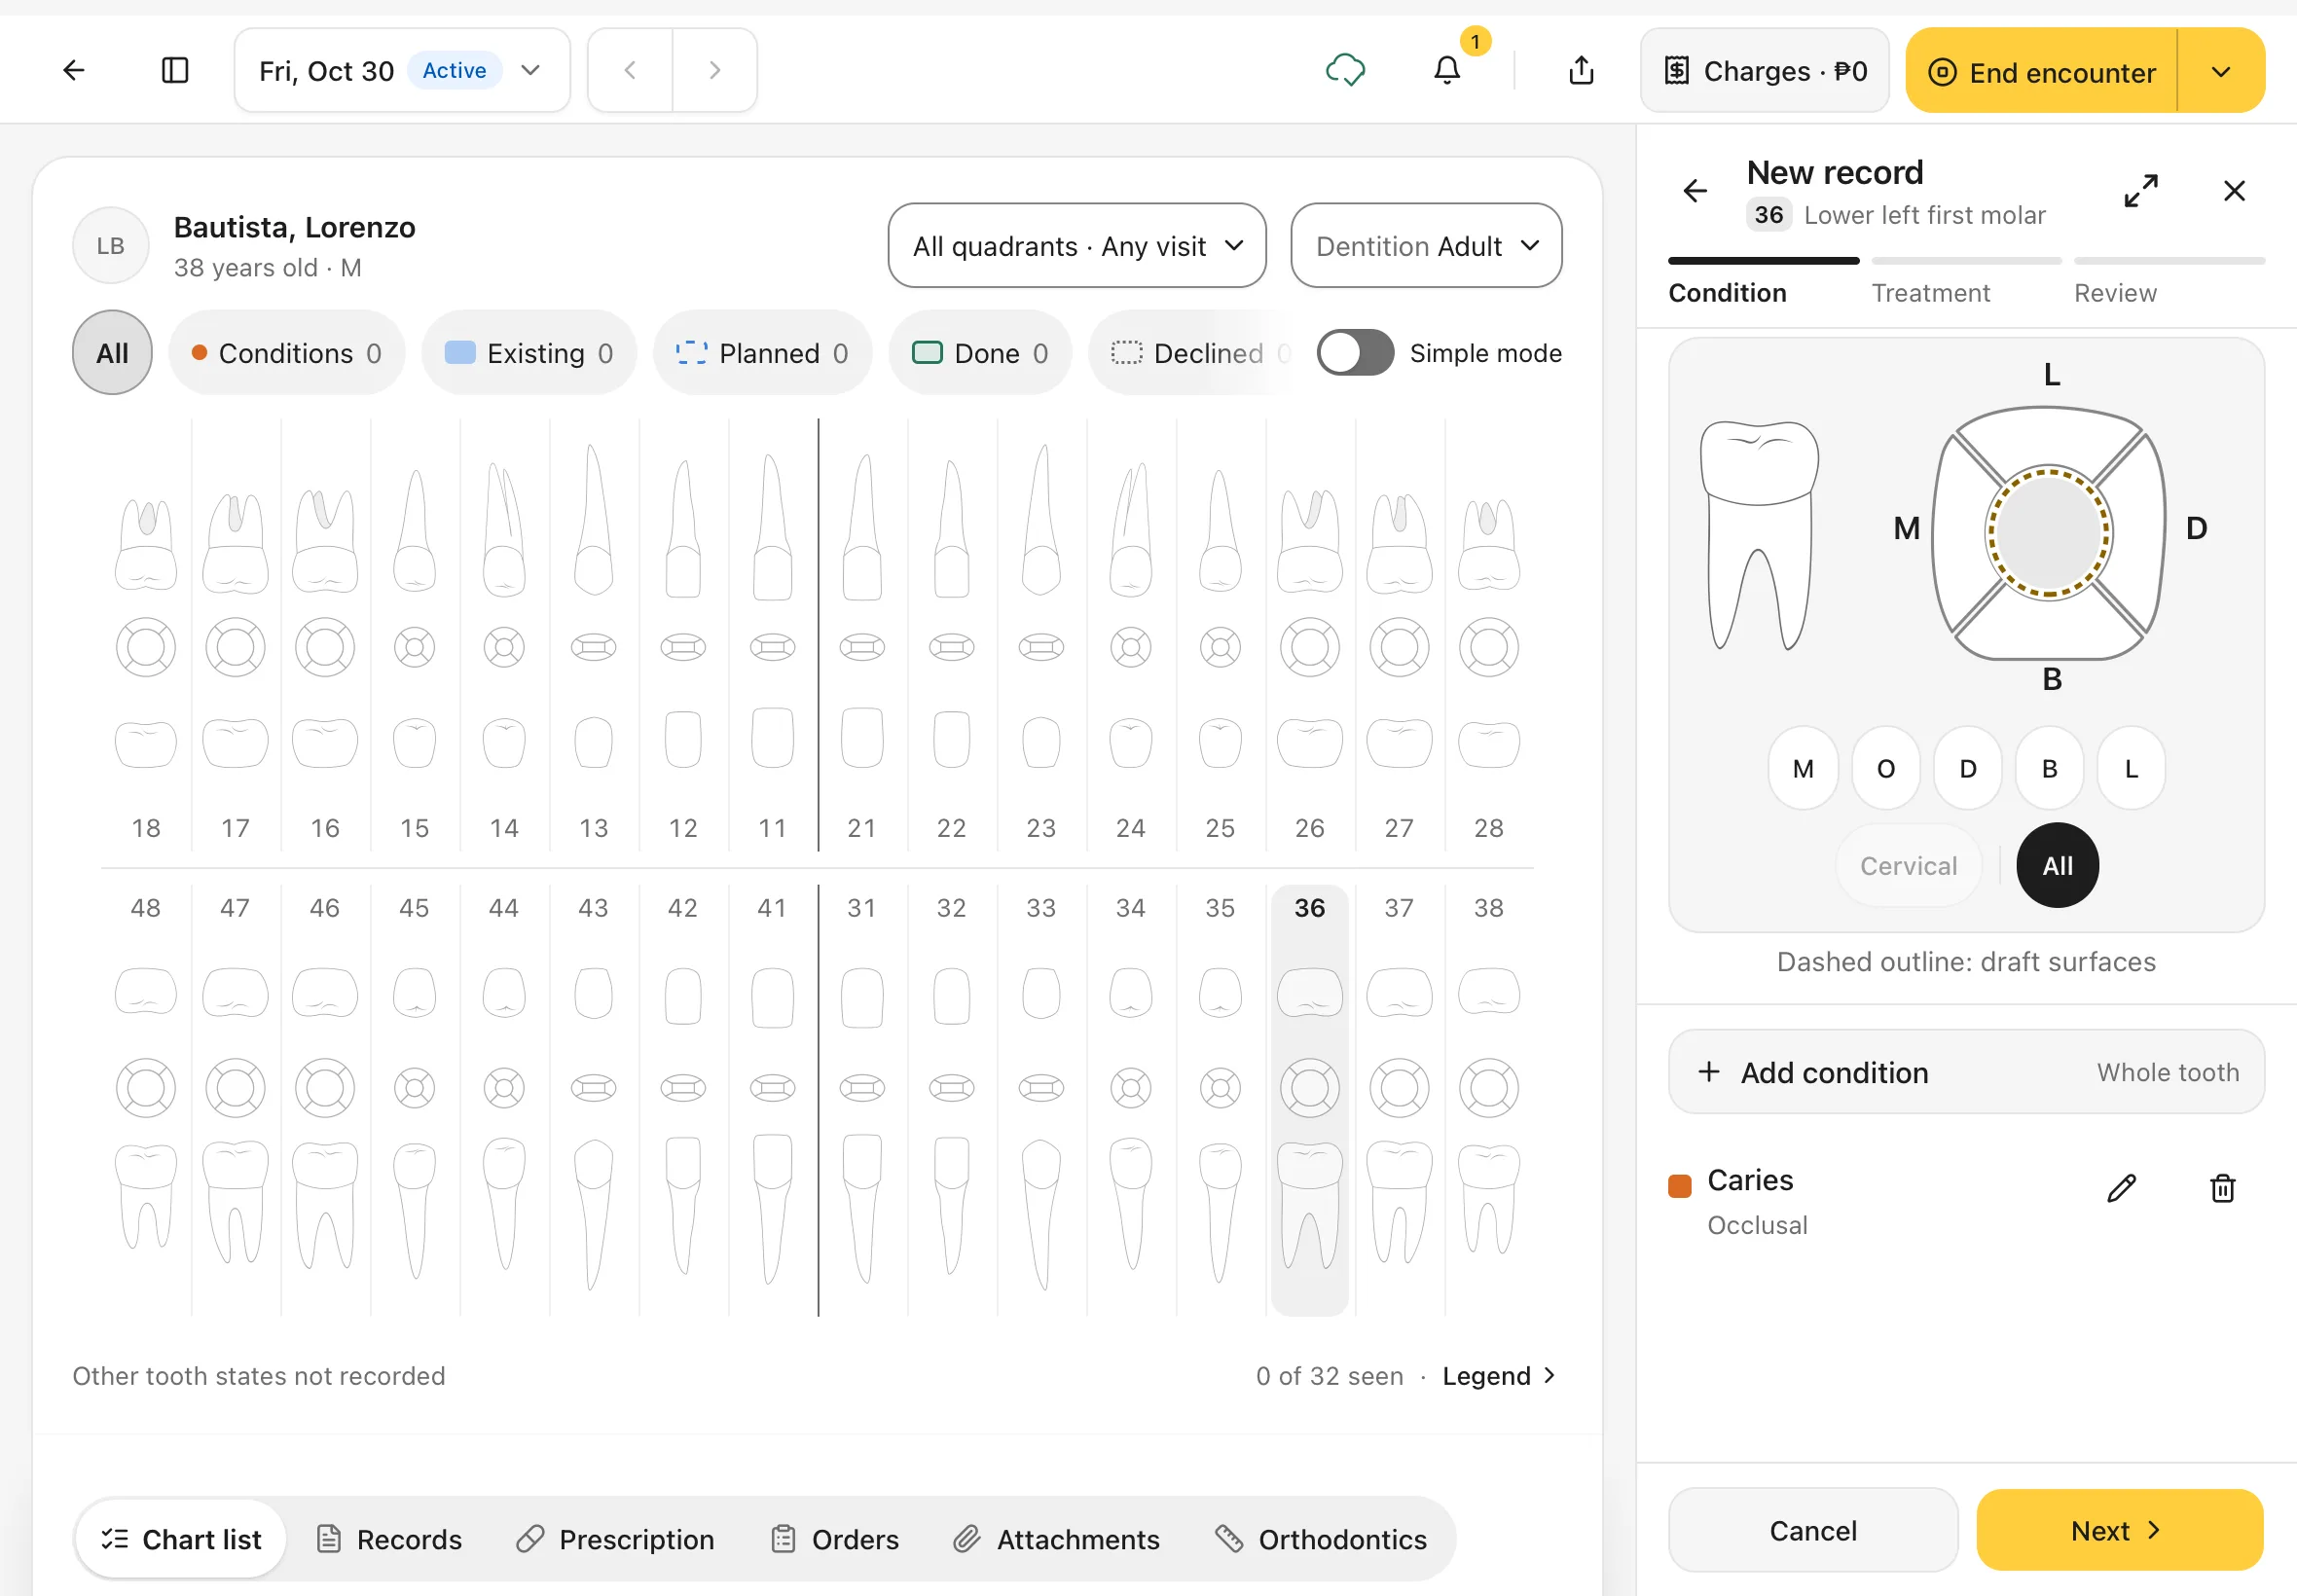
- Tap the surfaces that are affected on the tooth drawing, or use the letters under it (M, O, D, B, L; upper teeth show P instead of L). All means the whole tooth; Cervical is the neck of the tooth.
- Tap Add condition.
- Pick the condition from the list, for example Caries. Use Search conditions to find one quickly.
The list is in three groups: Conditions, Existing work (fillings, sealants and other work the patient already has) and More conditions.
You should see: Choose condition with the tooth and surface in the title, for example Tooth 36 · Occlusal.
5. Check the condition, then tap Next
The condition is added to the record, with the surface it's on. You can add more than one condition before you move on. Use the pencil to change one, or the bin to remove it.
Tap Next.
You should see: Caries with Occlusal under it. Until you save, the surface has a dashed outline on the drawing, and Dashed outline: draft surfaces under it reminds you it isn't saved yet.
6. Choose the treatment
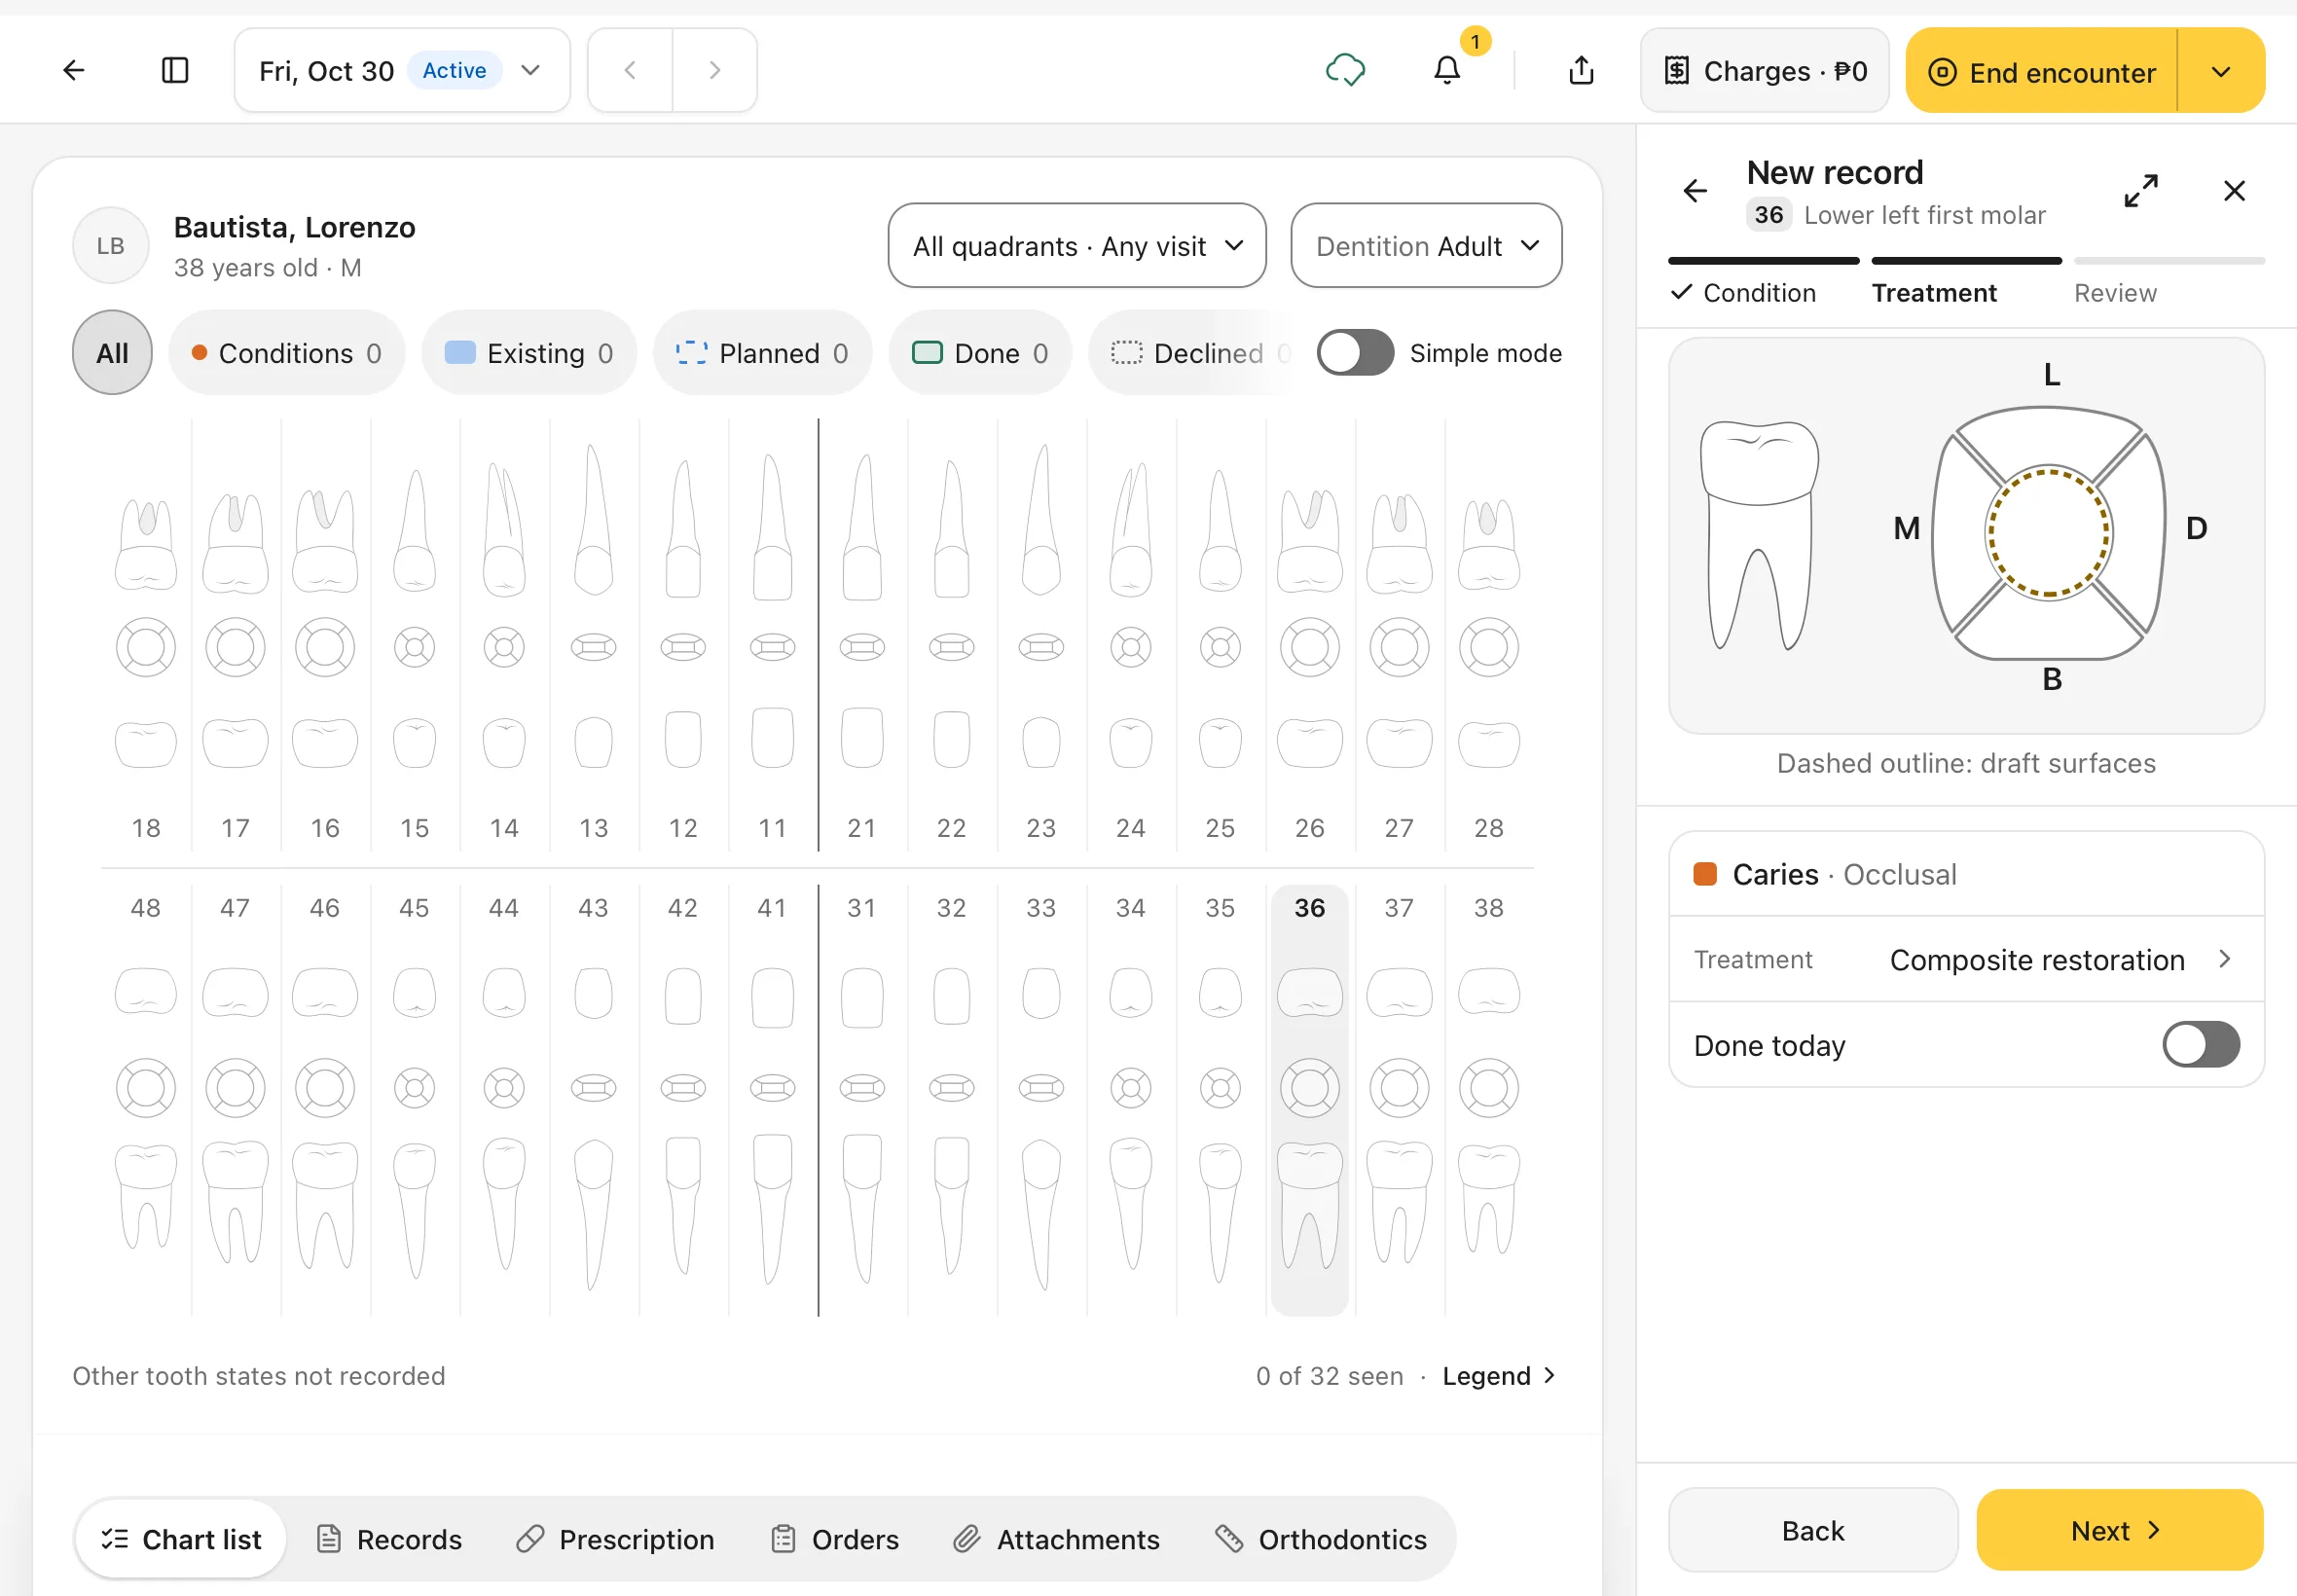
Dentalemon suggests the usual treatment for each condition, for example Composite restoration for caries. Tap it to pick a different one, or choose No treatment.
- Leave Done today off if you're planning the work for later. It goes on the patient's treatment plan.
- Turn Done today on if you did the work in this visit. It can then be charged.
Tap Next.
You should see: the condition, its Treatment, and the Done today switch.
7. Review and save
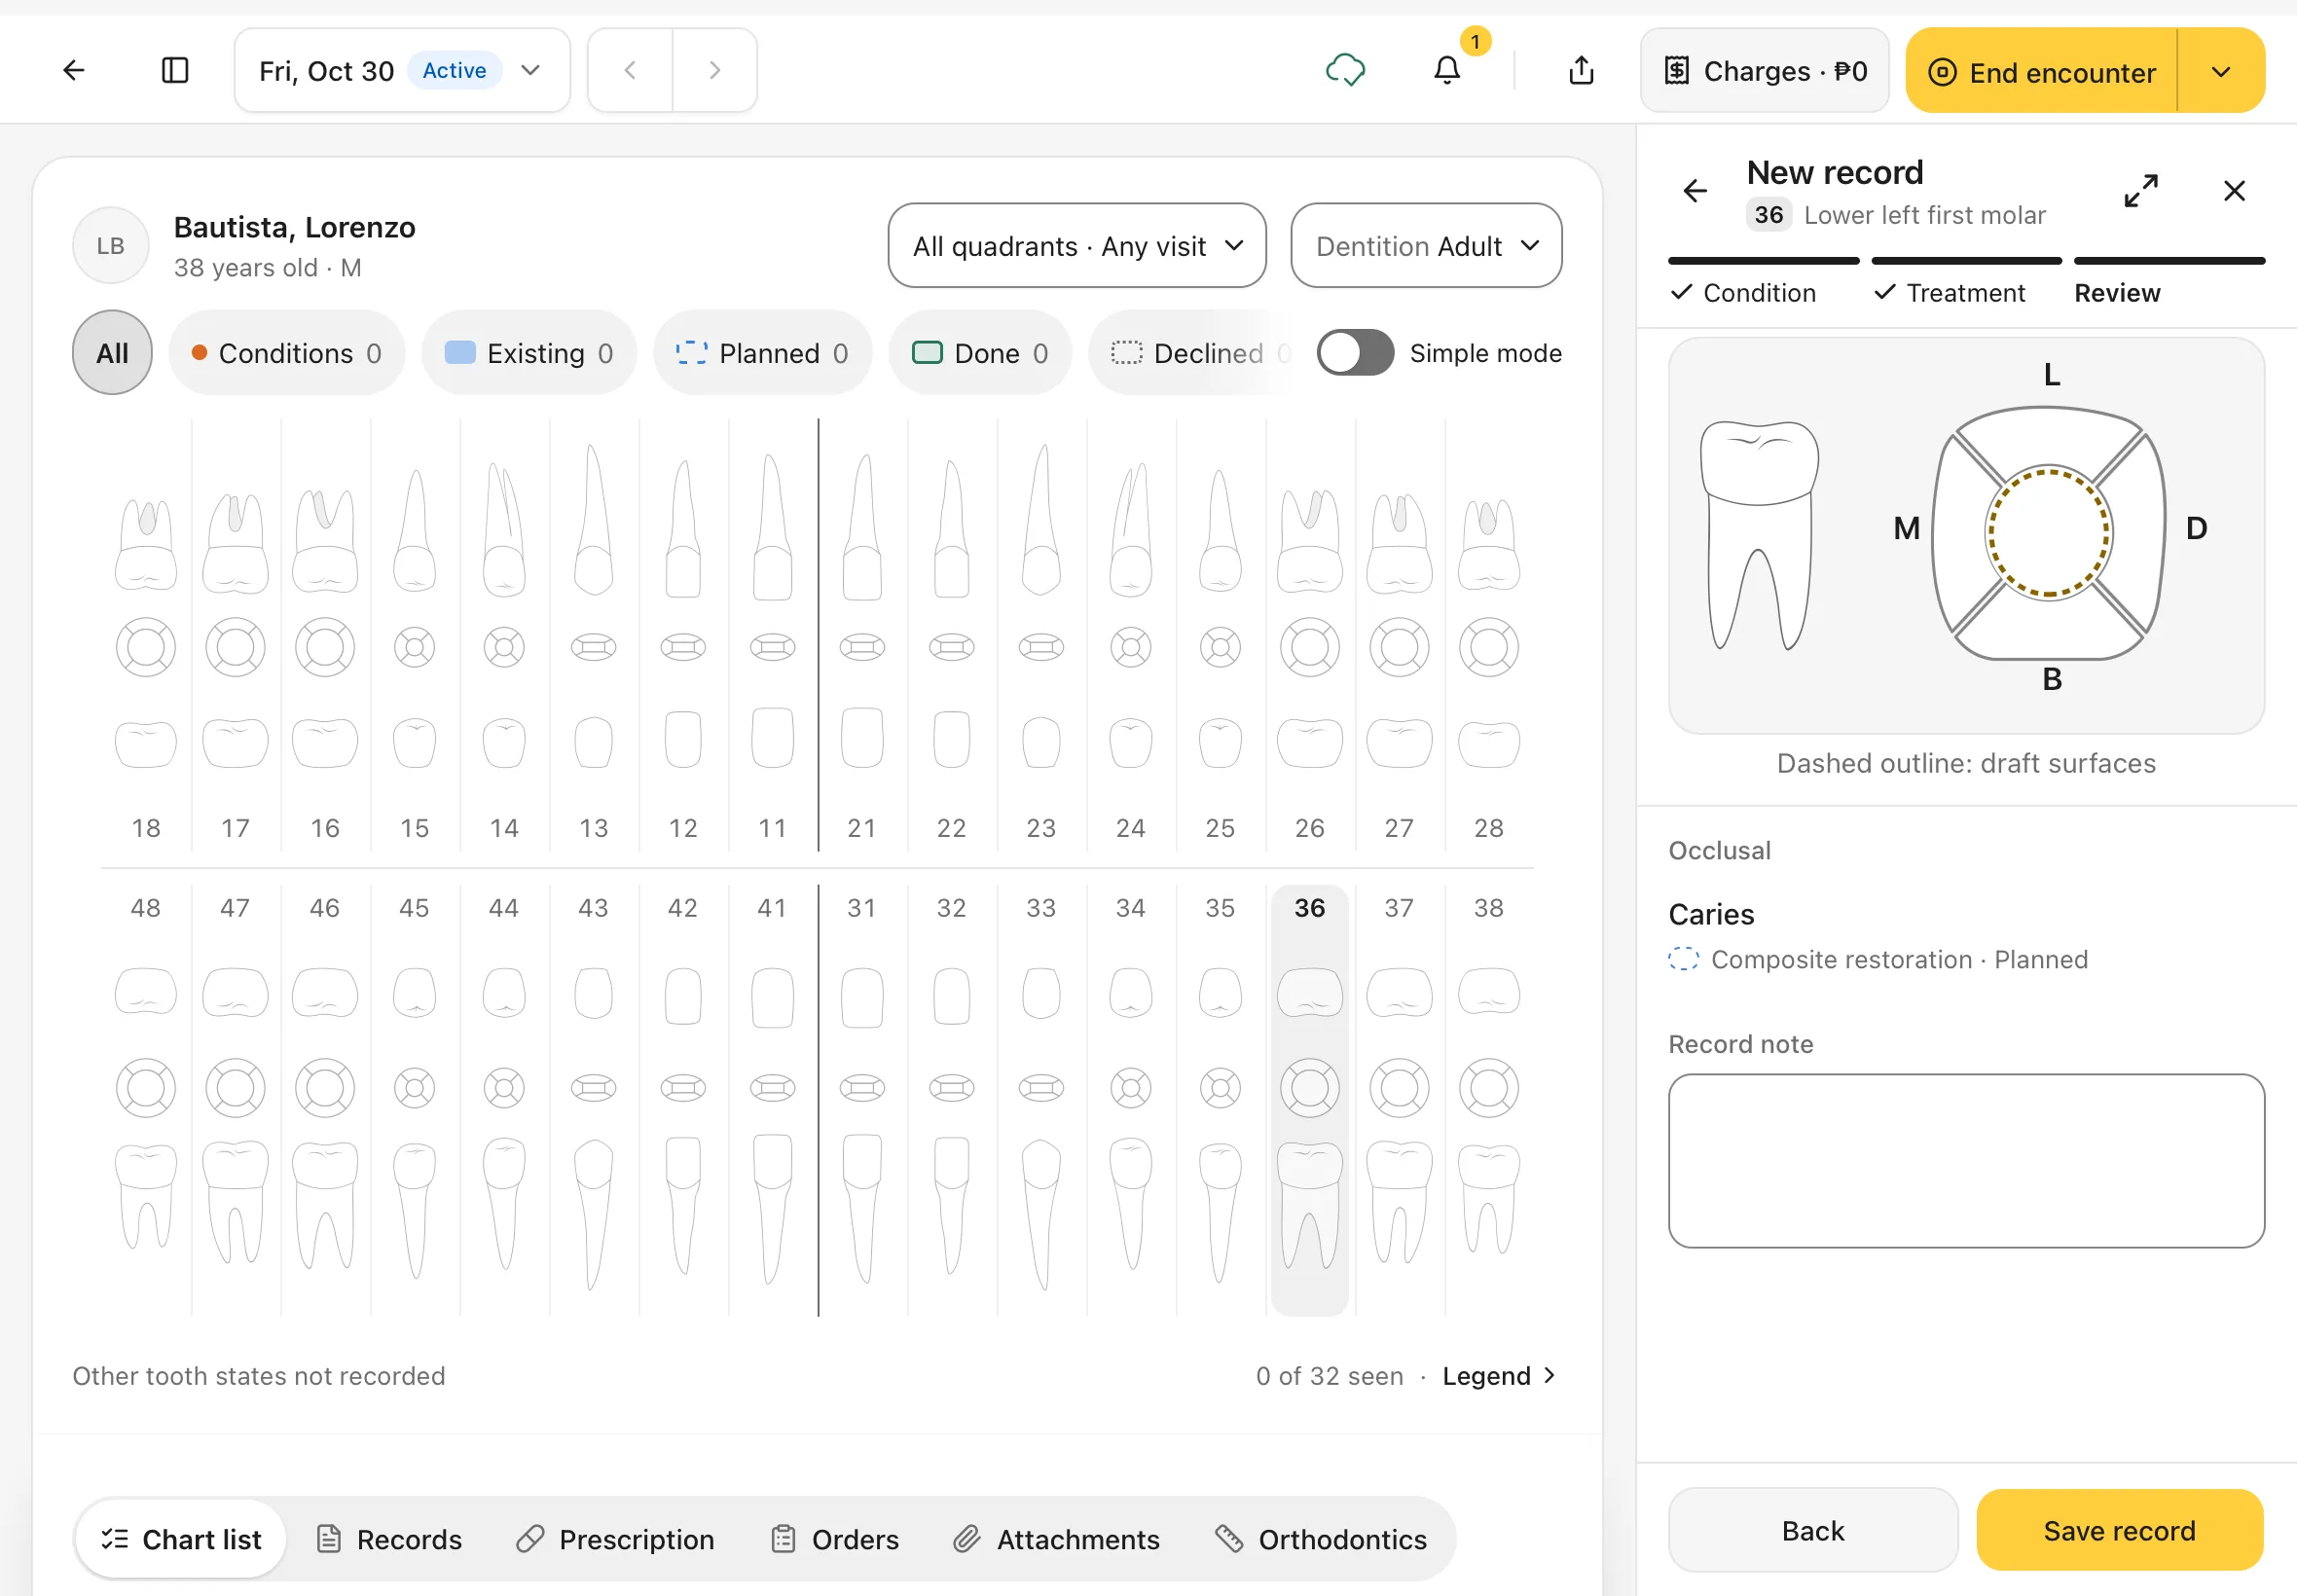
Check the summary. Add a Record note if you want, then tap Save record.
Nothing is saved until you tap Save record. To leave without saving, tap Back until you reach the first step, then Cancel.
You should see: Caries with Composite restoration · Planned under it.
8. See it on the chart (and Undo if you need to)
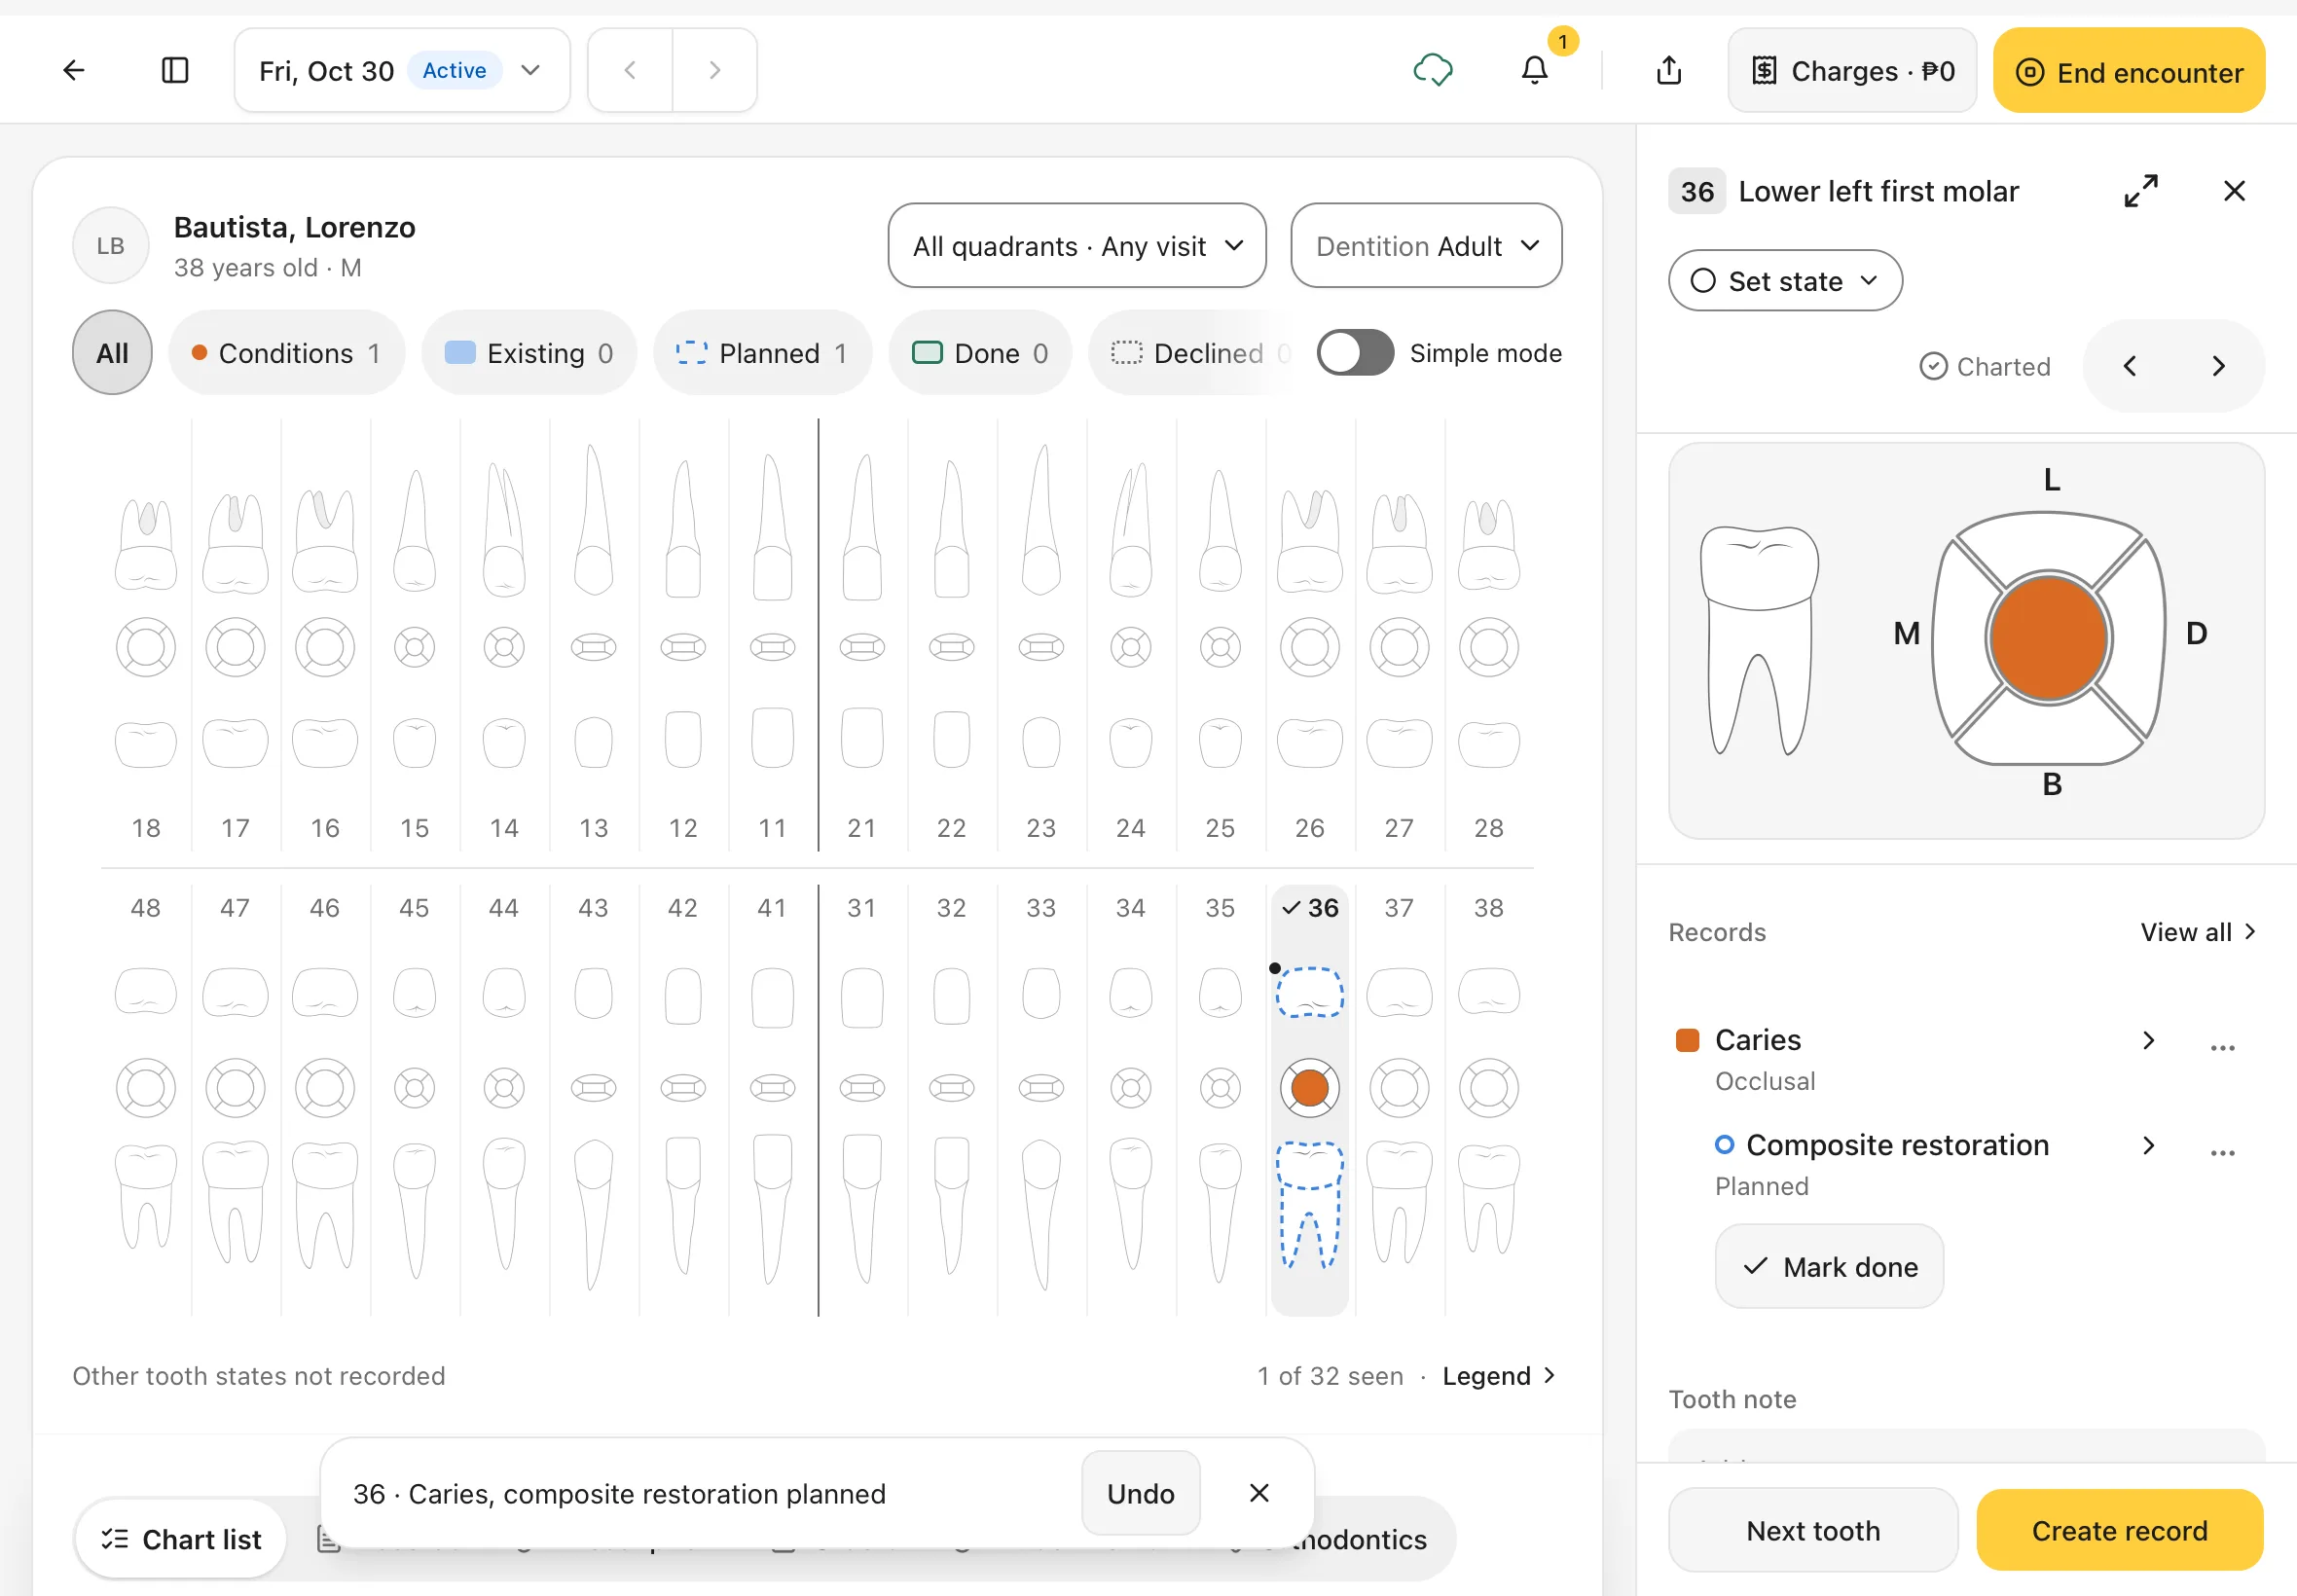
The tooth now shows the condition in colour, and the planned work as a dashed blue outline. The tooth gets a check mark, and the count under the chart goes up, for example 1 of 32 seen.
A message at the bottom confirms what you saved, for example 36 · Caries, composite restoration planned. Tap Undo right away to take it back.
You should see: the saved record in the tooth panel, with Mark done under the planned treatment.
9. Mark healthy teeth quickly
For a tooth with nothing to record, tap the tooth, then tap No findings. The tooth counts as seen, and the button becomes Next tooth so you can move along the arch.
You should see: No findings next to Create record at the bottom of the panel.
10. Mark a missing or extracted tooth
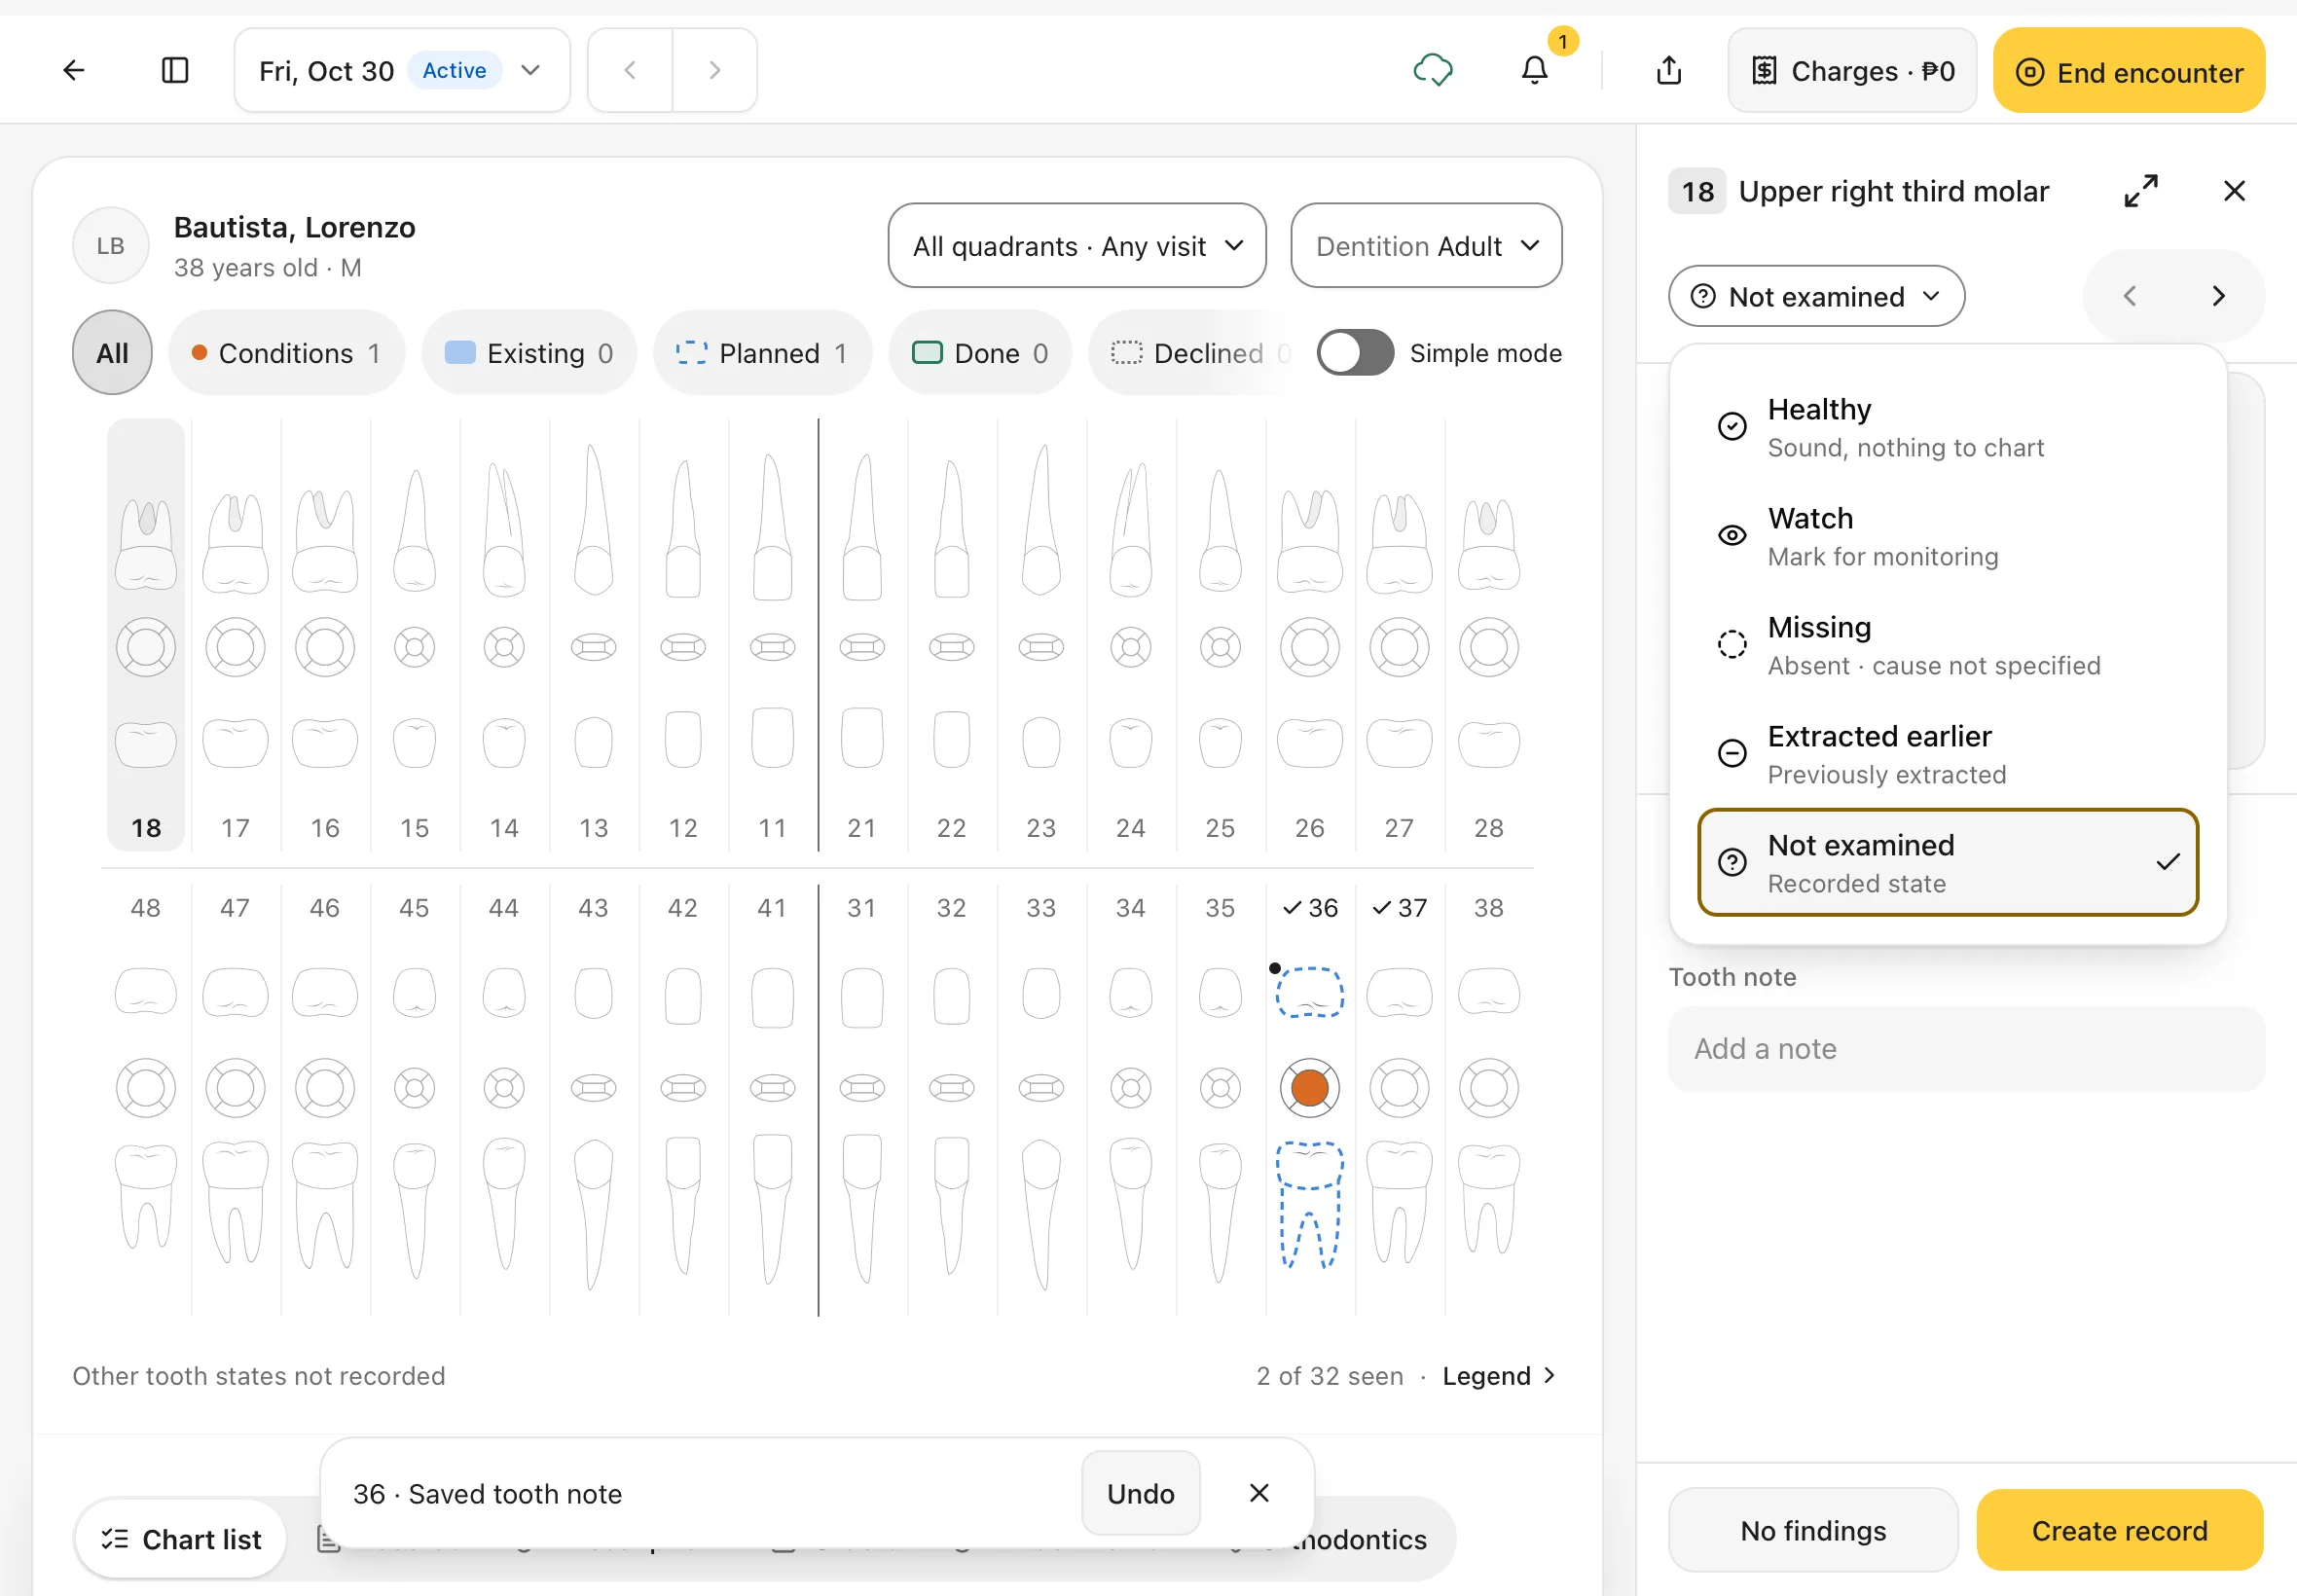
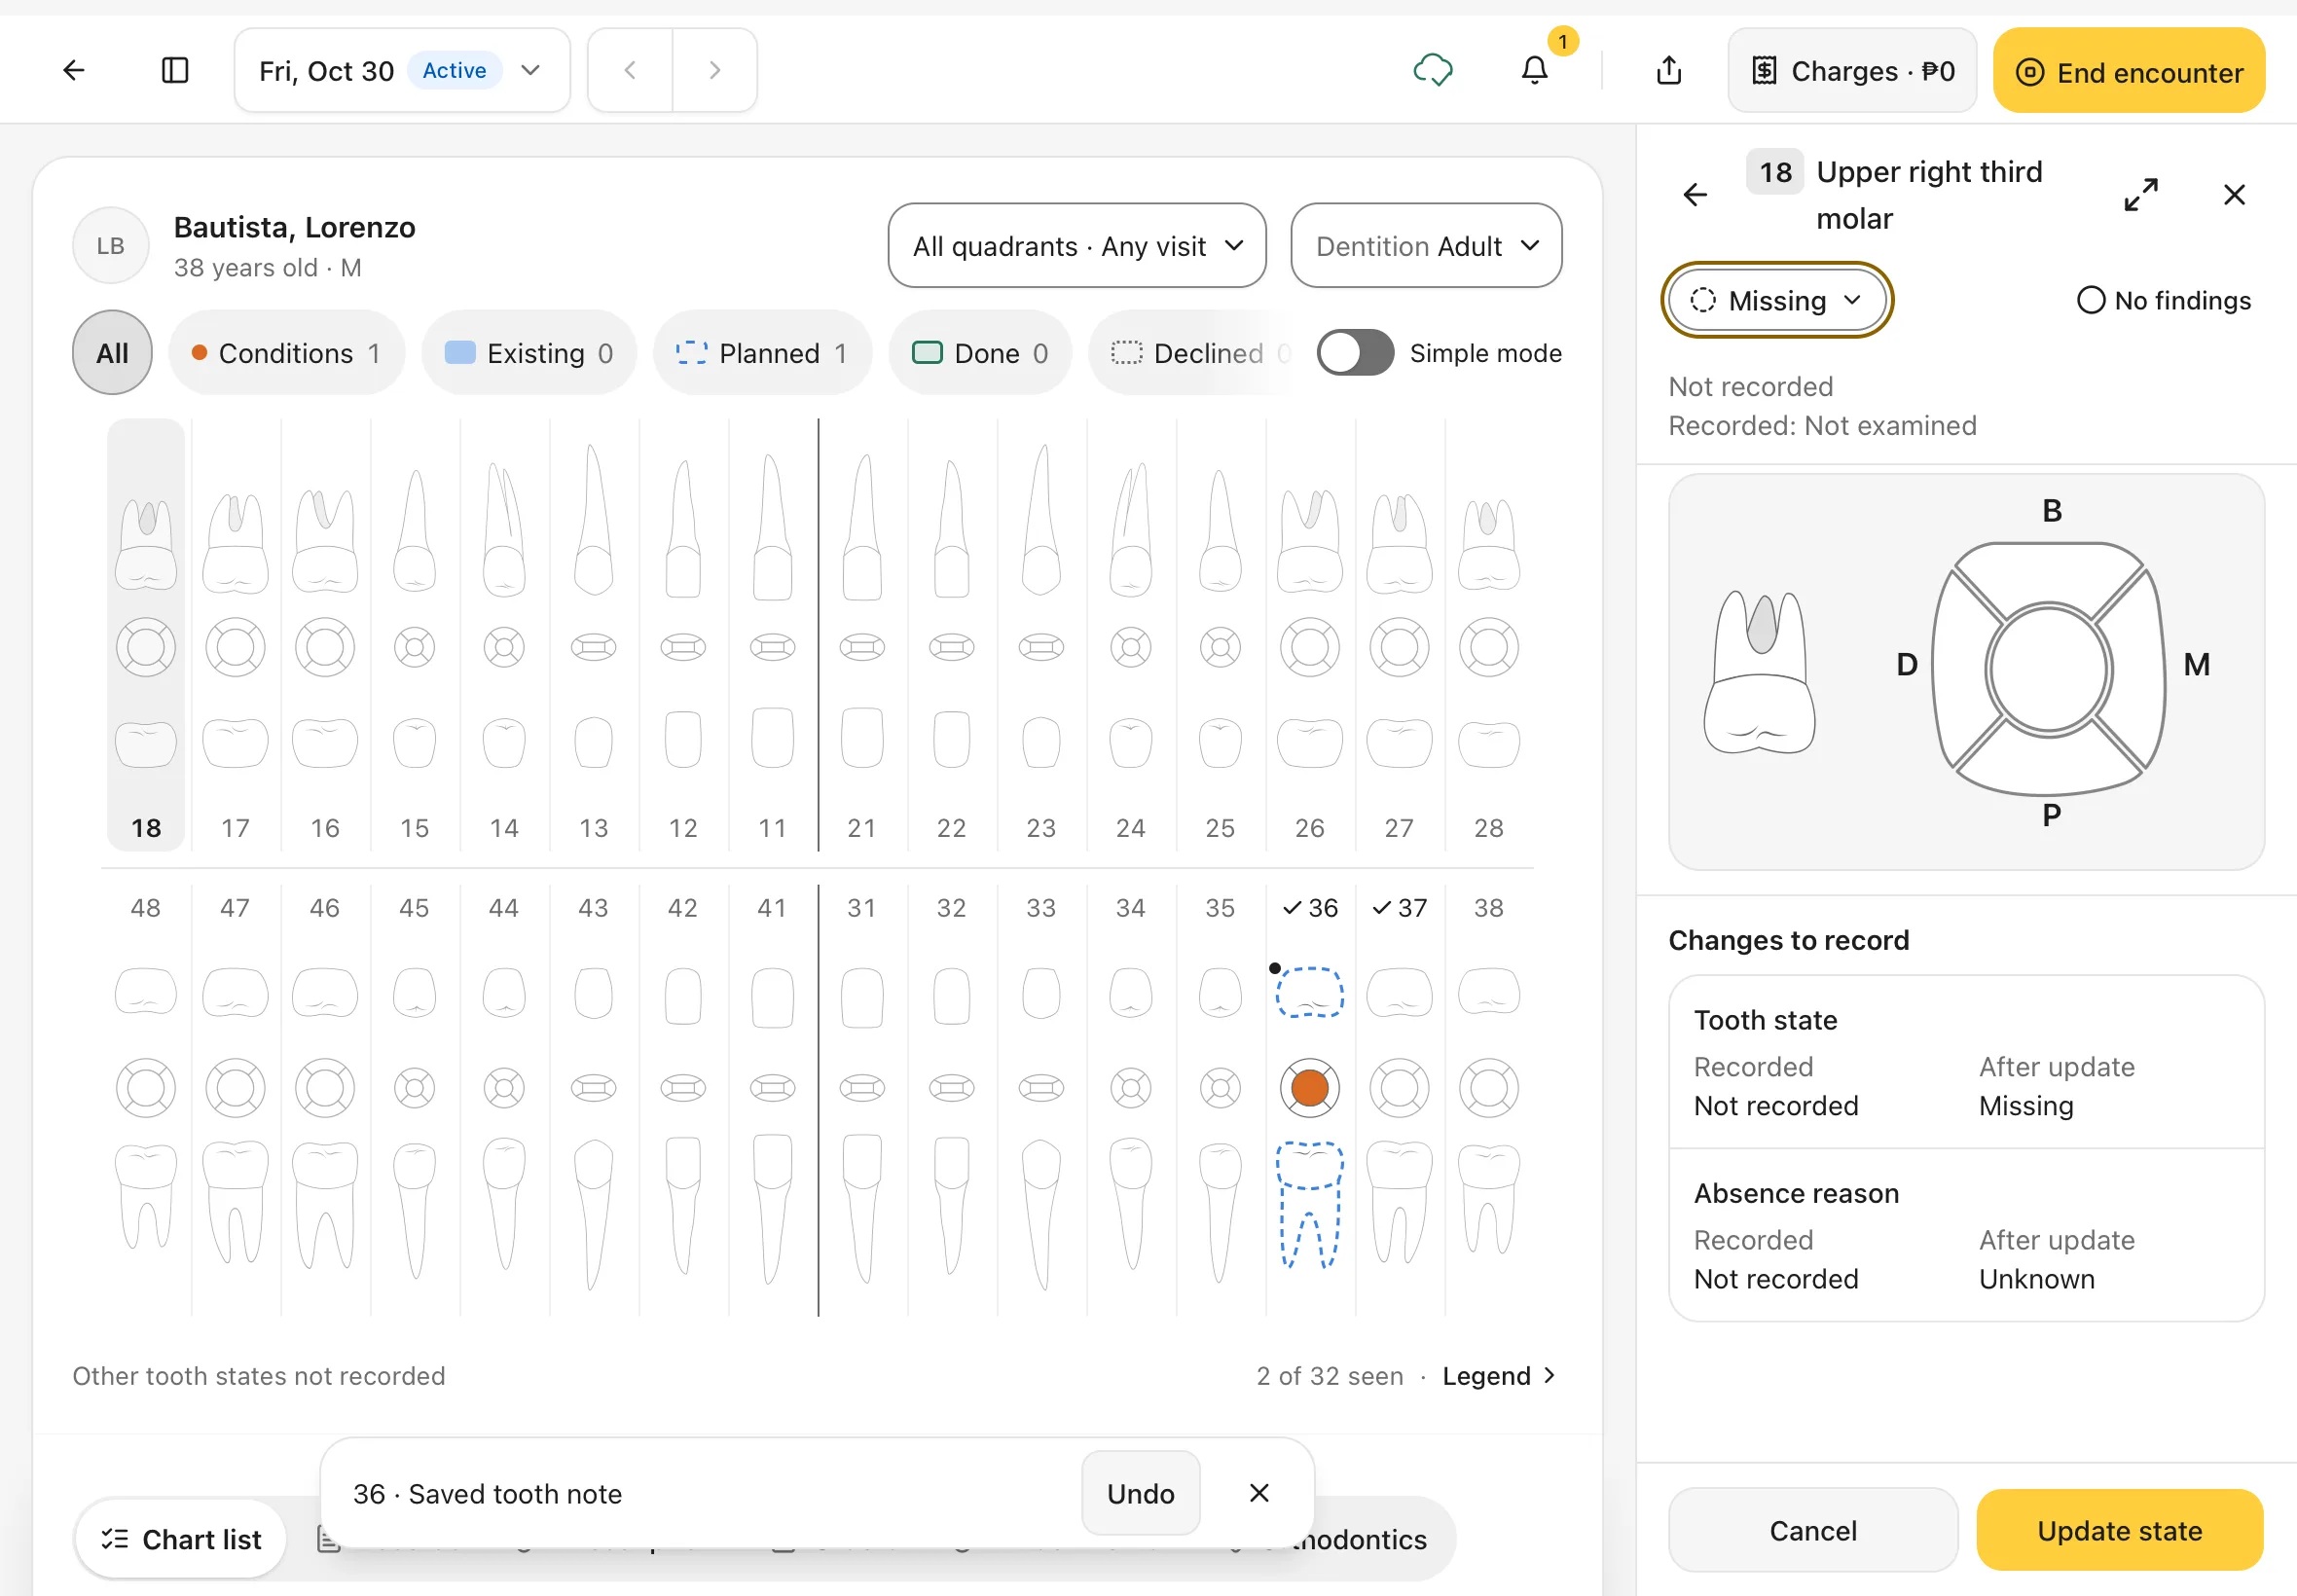
A tooth's state is its overall condition. It shows as a button under the tooth's name. A tooth nobody has looked at yet says Not examined; a tooth you've already charted says Set state.
- Tap the tooth, then tap its state button.
- Choose the state:
- Healthy: sound, nothing to chart.
- Watch: keep an eye on it at the next visit.
- Missing: the tooth isn't there and you don't know why.
- Extracted earlier: the tooth was taken out before.
- Not examined: clears the state, as if you hadn't looked.
- Check Changes to record, which shows the state before and after, then tap Update state. Tap Cancel to leave it as it was.
You should see: the list of states, each with a short description. A choice that doesn't fit the tooth right now is greyed out and says why (for example, a tooth with planned work can't be marked Missing).
11. Check the Legend
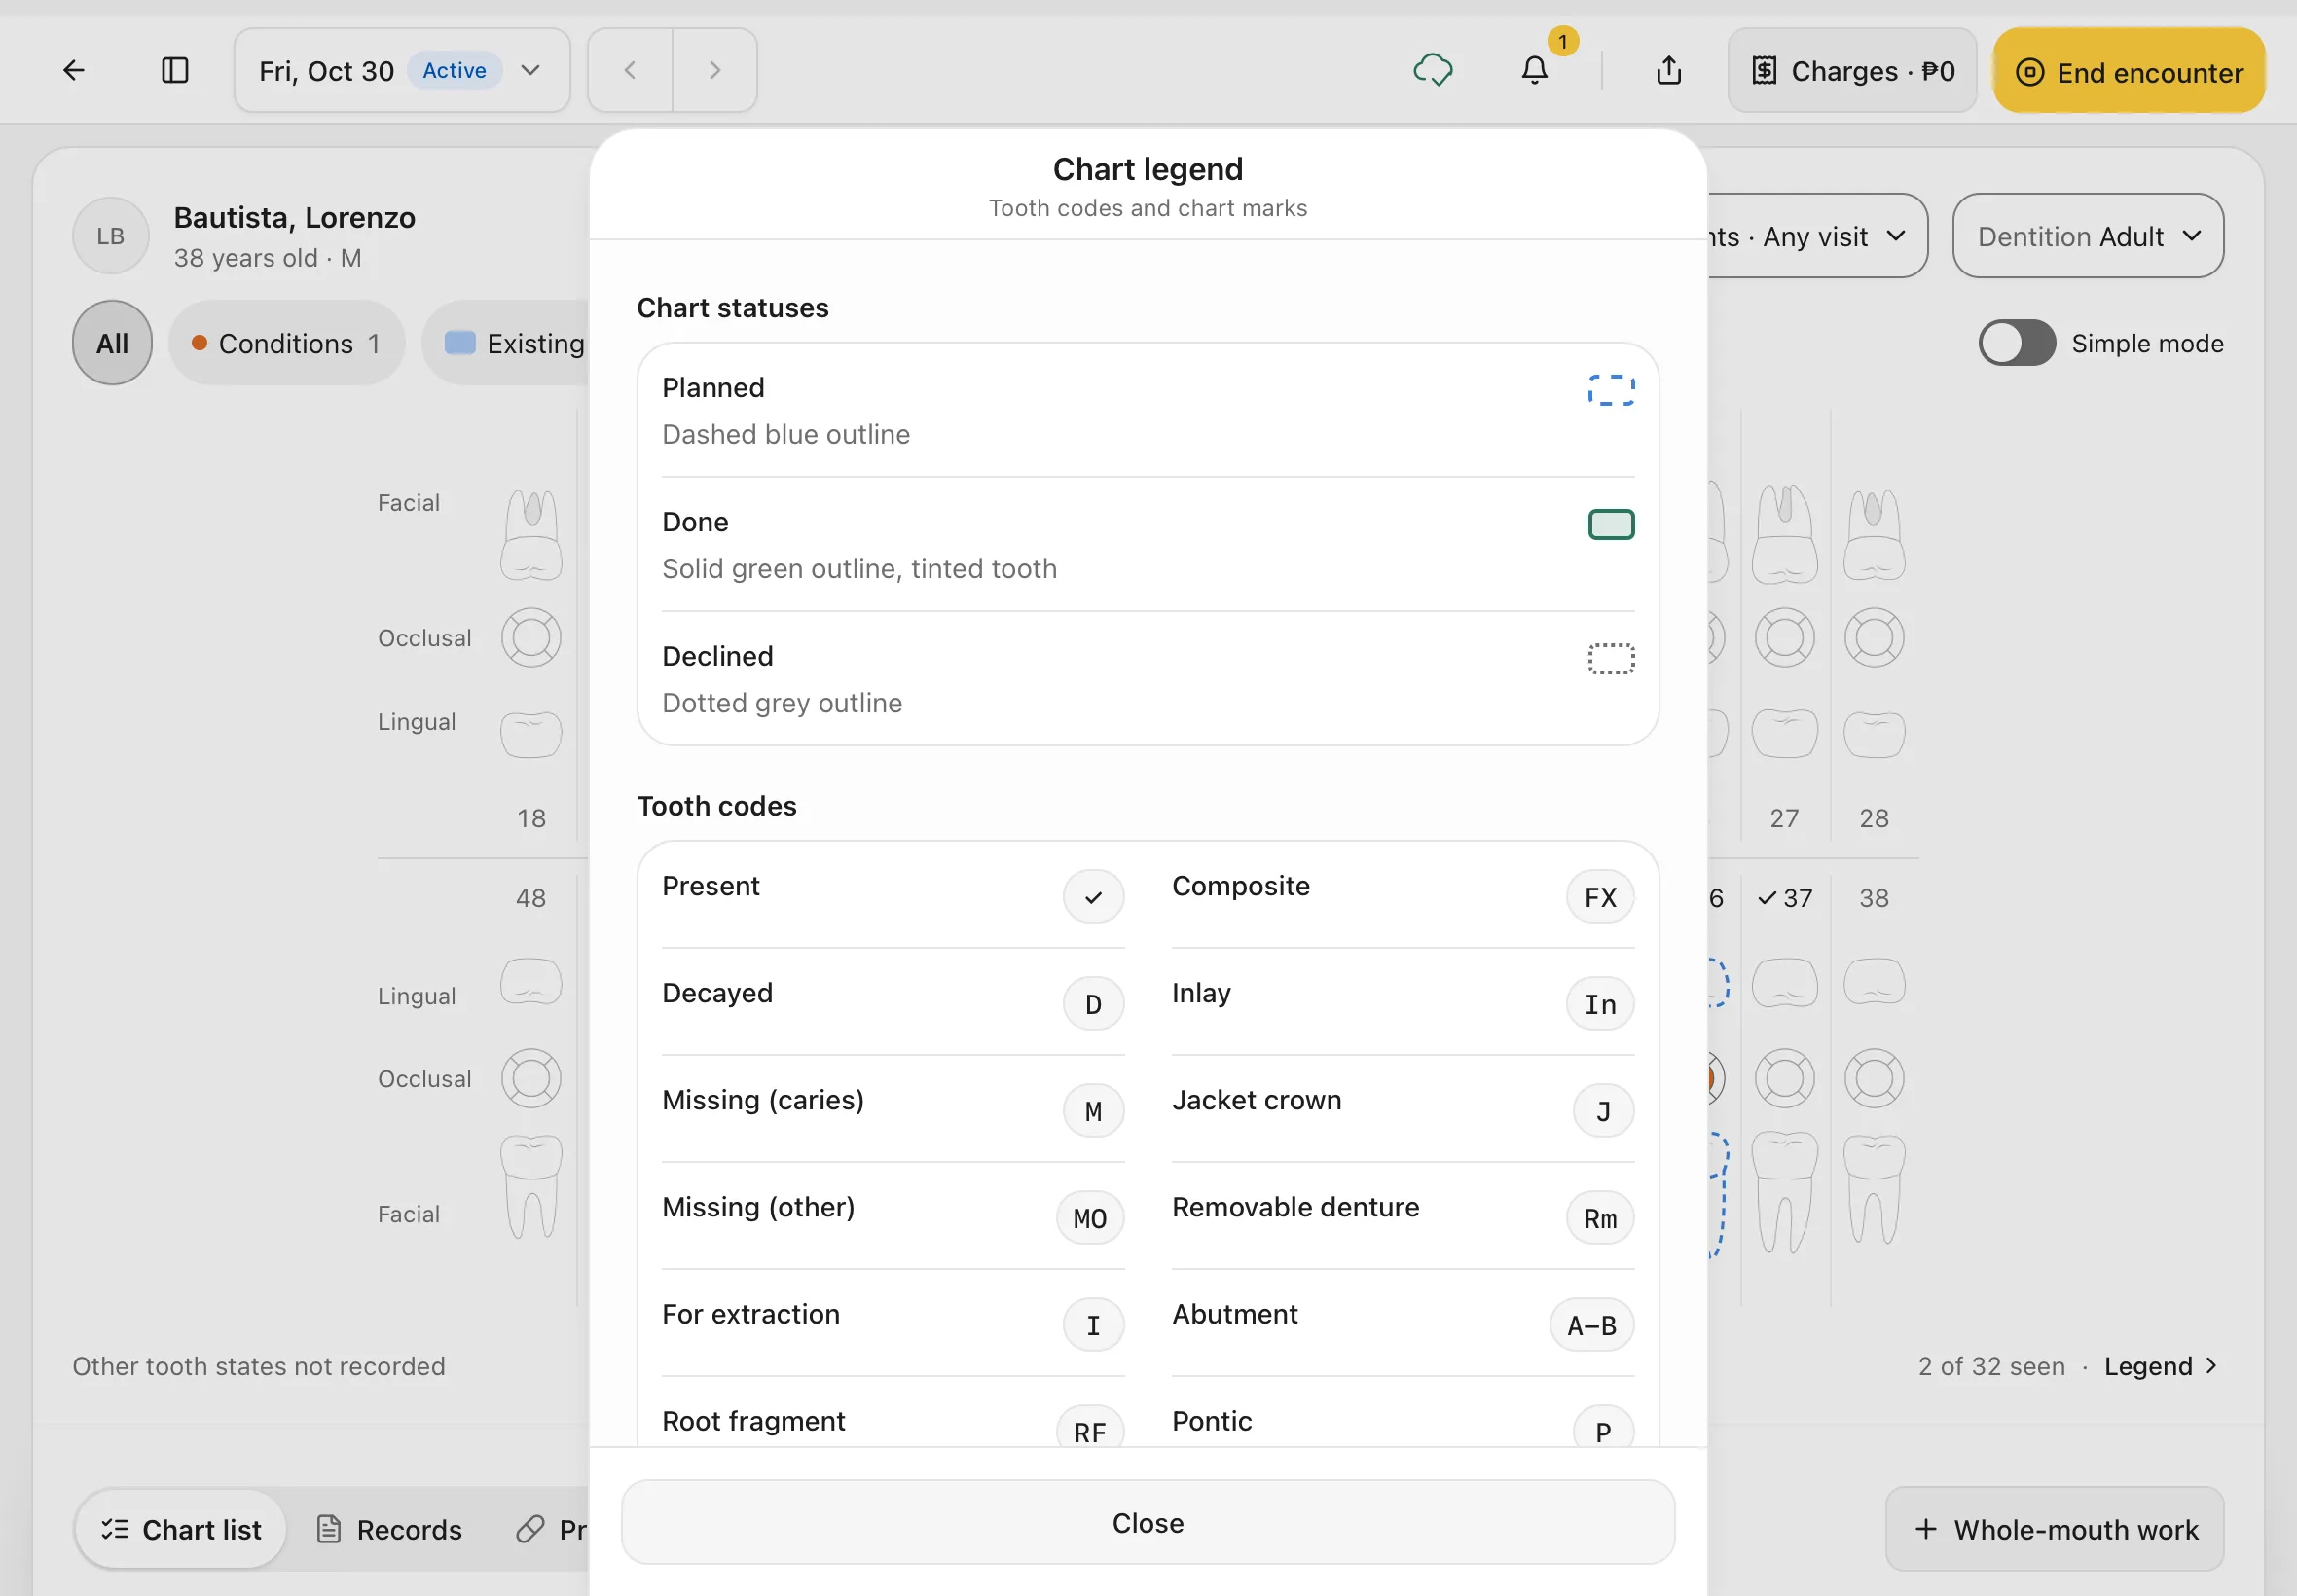
Tap Legend › under the chart, next to the count of teeth seen, to see what each mark means:
- Planned: dashed blue outline
- Done: solid green outline, tinted tooth
- Declined: dotted grey outline
It also lists the tooth codes, such as D for decayed and I for extraction.
You should see: Chart legend with Chart statuses and Tooth codes.
12. Record work for the whole mouth
Some work isn't on one tooth: a cleaning, a panoramic X-ray, a denture. Under the chart, tap Whole-mouth work.
- Choose the Treatment. Each one shows its price and what it covers (Whole mouth, One arch, Quadrants or Patient).
- For arch or quadrant work, choose which arch or quadrants.
- Under Record as, choose Planned or Done today.
- Tap Add.
You should see: Whole-mouth work with your clinic's treatments and prices.
13. Add a note about a tooth
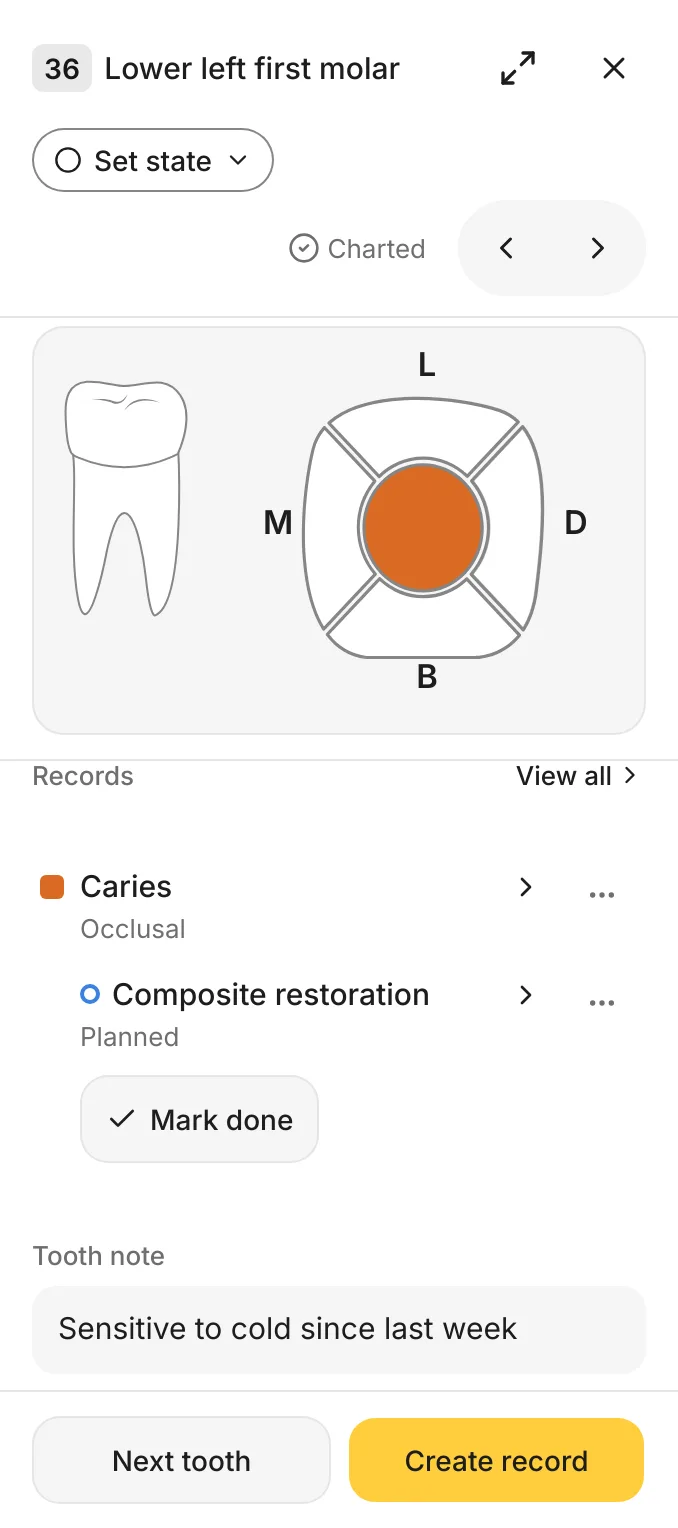
In the tooth panel, tap Tooth note (it says Add a note) and type, for example Sensitive to cold since last week. The note saves by itself when you tap anywhere else. A message confirms it, for example 36 · Saved tooth note, with Undo.
You should see: your note under Tooth note in the panel.
14. Change or correct a record
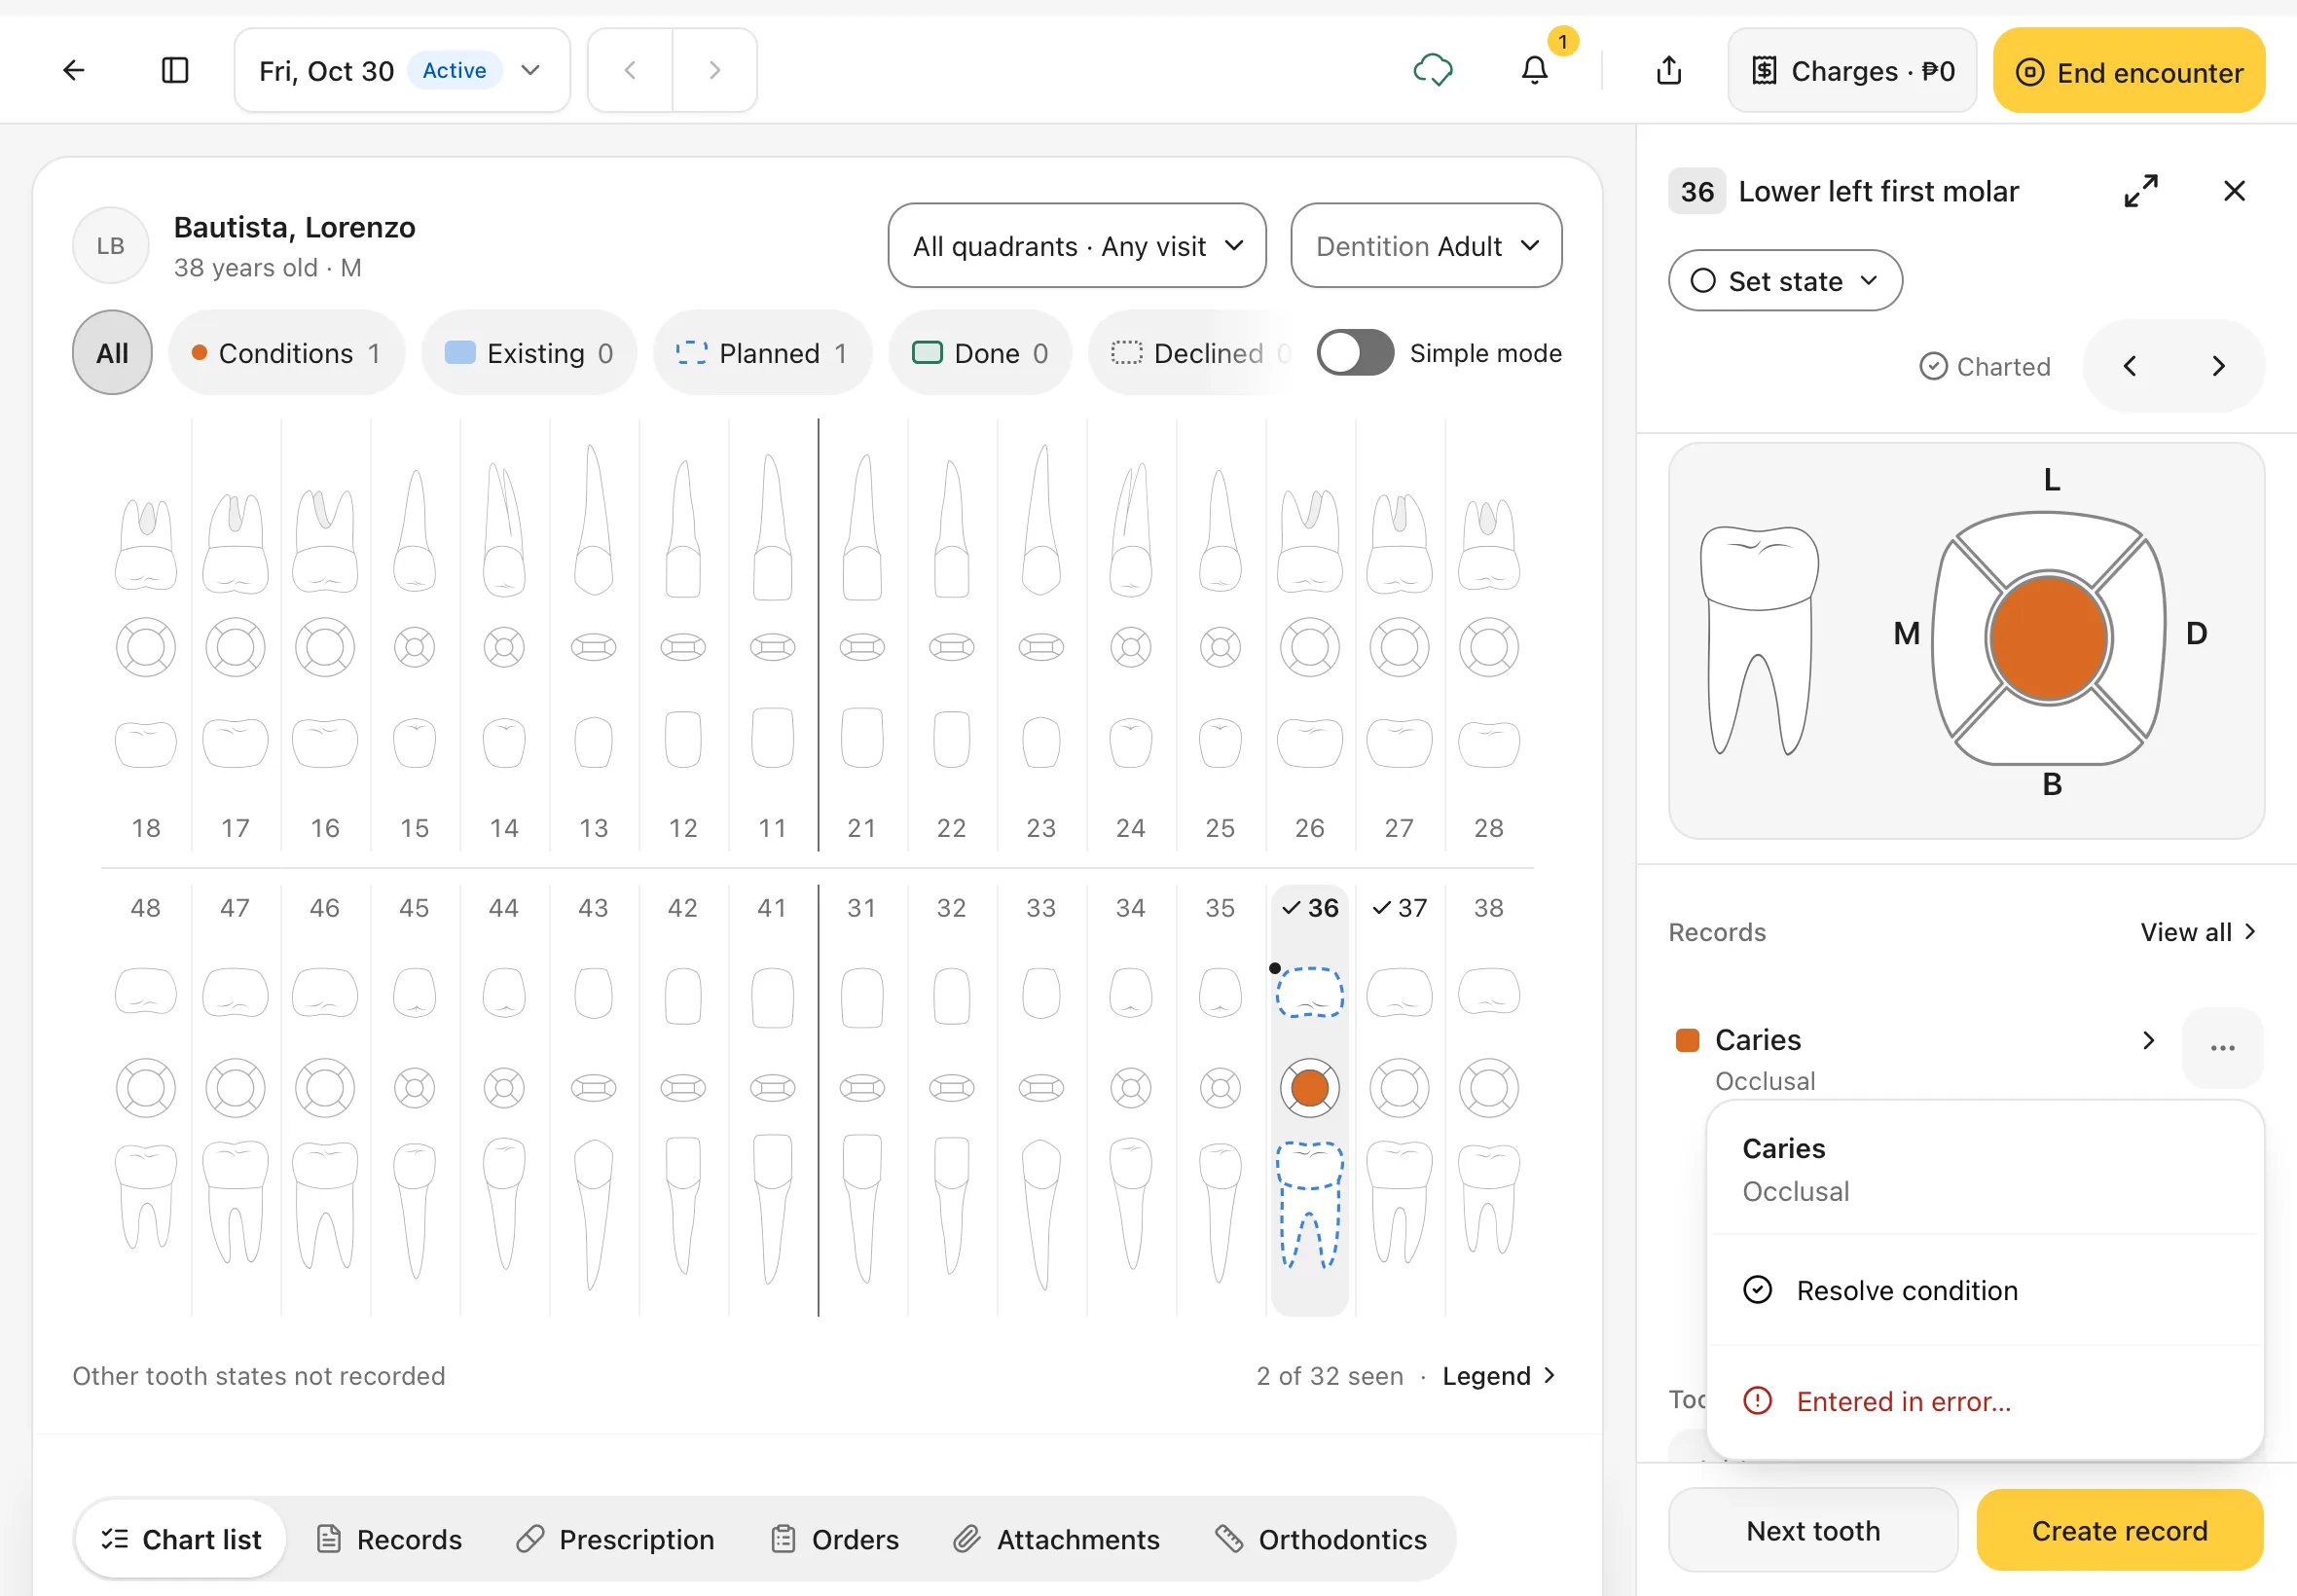
Each record in the tooth panel has a ⋯ button. What it offers depends on the record:
| Record | ⋯ offers |
|---|---|
| A condition, such as Caries | Resolve condition (it's been dealt with) or Entered in error… |
| Planned work | Mark done, Patient declined or Dismiss from plan… |
| Work you did today | Entered in error… |
Entered in error… is for a record you saved by mistake. Pick a reason (for example Wrong tooth or surface or Recorded twice), then tap Mark in error. The record isn't deleted: it stays in the tooth's history, marked as an error.
You should see: the menu under ⋯, headed with the record's name and surface.
15. Stop half-way and come back
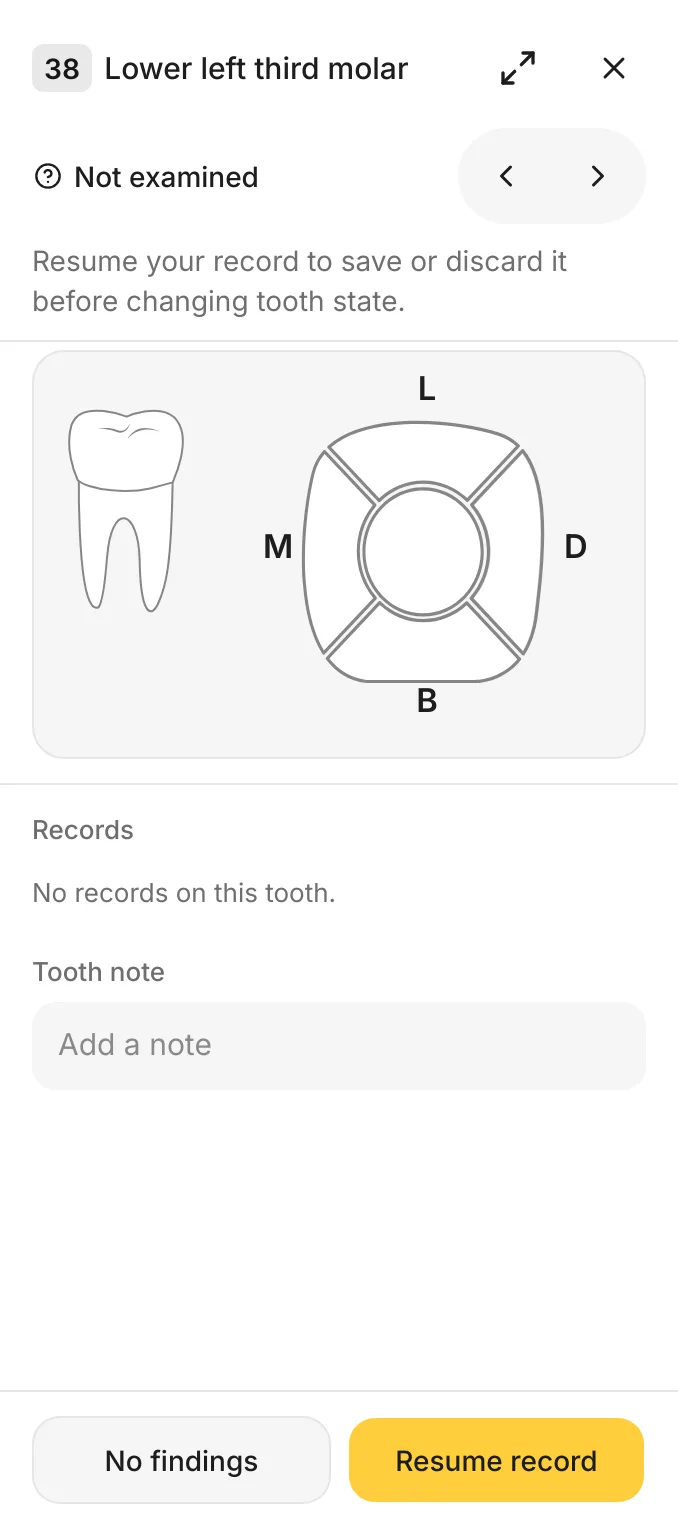
If you leave a record before saving it, for example by tapping the back arrow in the panel, Dentalemon keeps it for that tooth. The yellow button then reads Resume record. Tap it to carry on where you stopped.
While a record is waiting, you can't change the tooth's state. The panel says so.
You should see: Resume record at the bottom of the tooth panel.
To throw it away instead, tap Resume record, go Back to the first step, tap Cancel, then Discard record.
Tips
Chart the whole mouth fast
Start at 18, then use No findings (it becomes Next tooth) on healthy teeth and Create record only where you find something. The count under the chart tells you how many teeth you've seen.
Bigger tooth panel
Tap the expand arrows in the tooth panel's corner to see the tooth full screen. This helps on a smaller iPad.
If something goes wrong
- The Next button is greyed out. Choose at least one condition first.
- You closed the record by mistake. The button now says Resume record. Tap it to carry on where you left off.
- You saved the wrong thing. Tap Undo on the message straight away. Later, use the ⋯ menu on the record in the tooth panel.
Good to know
- Planned work goes to the patient's treatment plan. See Treatment plan and Estimate.
- Work marked Done today can be added to the bill when you finish the visit.
- Once a visit has ended, its chart is view only.